
3. Put Code and Data into the Workspace
📍 Where you are: Task Owner 3/7 — ① Design → ② Create Task → ③ Workspace → ④ Train · publish → ⑤ Approve → ⑥ Campaign → ⑦ Results
Screen: Agent Studio (+ Finder) · Next: train the first model and publish it to the Registry
🎯 What you do in this step: Open the empty Task from chapter 2 in Studio (Workspace) and put in the finished code, which is the regular training code from chapter 1 moved into the shape FedOps defines. Then place the Owner’s own data (Hungarian hospital). Once published in chapter 4, this code is distributed and run as is on every Client’s PC. So the Owner’s code is the agreement for the whole federated learning.
- Why move the code into a fixed shape
- 1) Open the Workspace in Studio
- 2) Put in the template files (Finder)
- 3) Install the Python environment (Sync)
- 4) Place the Owner’s data
- 5) Fixing preprocessing statistics — already done
- ✅ Checklist
- If something goes wrong
- Next
Why move the code into a fixed shape
train_centralized.py in chapter 1 was a script you ran yourself. In federated learning you do not run your own code.
| Who | Calls what in my code |
|---|---|
| Aggregation server | The function that builds the model (it must know the parameter shapes to merge) |
| Each Client’s Studio | The data loading, training, and evaluation functions |
| Agent (Model Use Track) | The prediction function |
For others to call your code, names and arguments must be agreed on. So FedOps puts your code into functions whose names and arguments are fixed. Look for two markers in the template code.
| Marker | Meaning |
|---|---|
# FEDOPS CONTRACT | A function whose name, arguments, and defaults cannot be changed. FedOps calls it without looking inside (e.g. build_model, the training function) |
# USER IMPLEMENTATION | Your part, written however you like (e.g. the layer layout of the TabularMLP class) |
The implementation inside functions is free. This tutorial uses the finished conversion (template/federated-task/) as is.
1) Open the Workspace in Studio
① Workspace screen
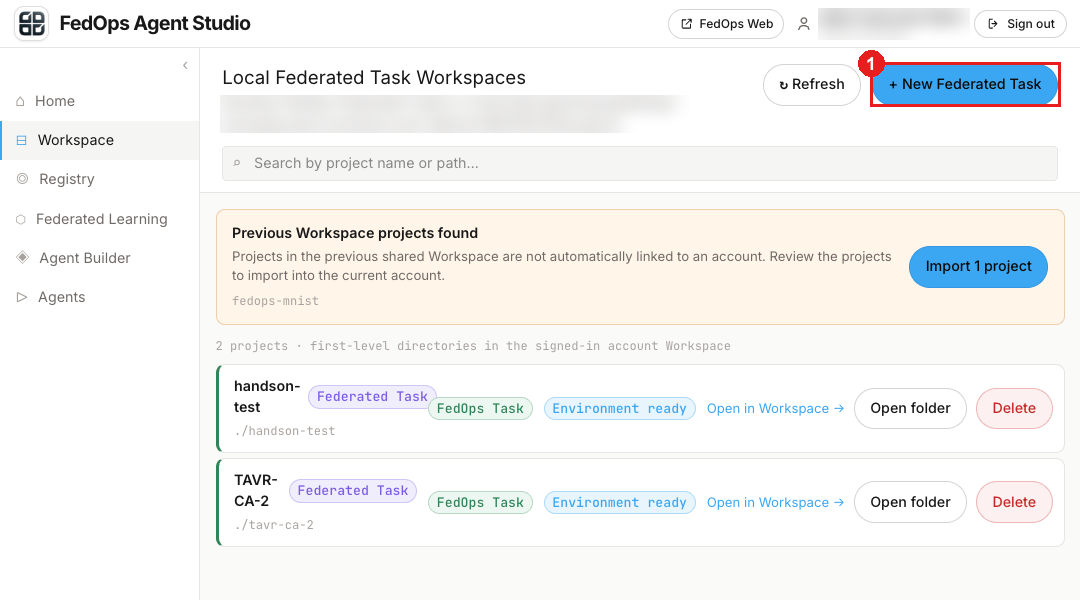
- Choose Workspace in the Studio left menu, then click + New Federated Task at the top right.
② Start a Federated Task Workspace window
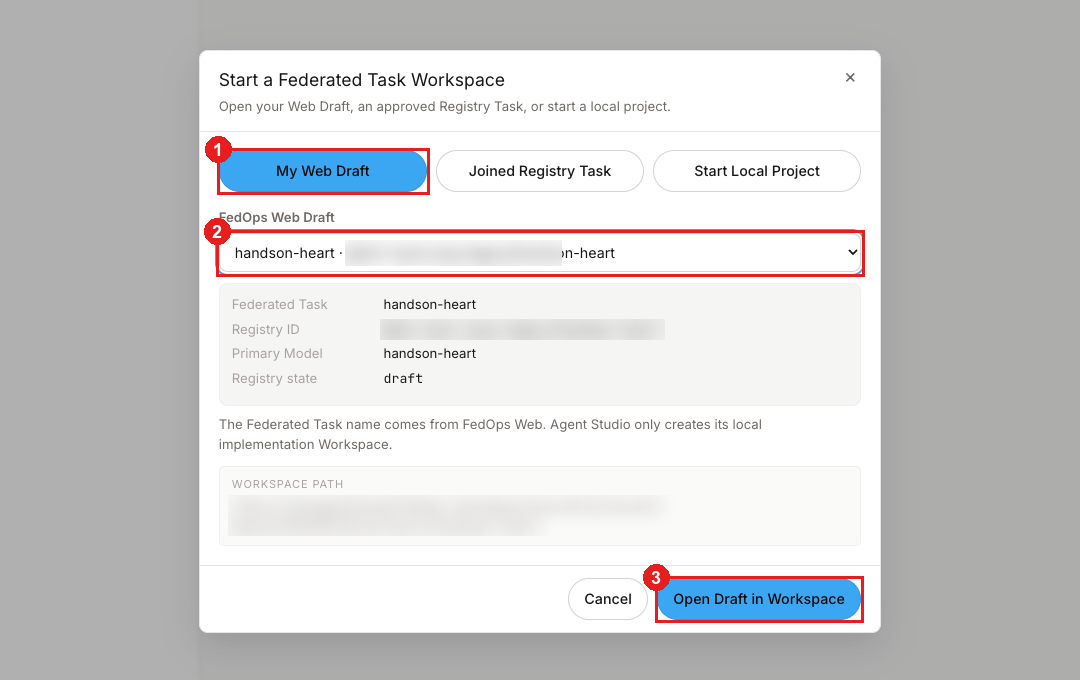
- Choose the My Web Draft tab.
- Pick the
handson-heartyou just created in the FedOps Web Draft list. - Click Open Draft in Workspace.
③ The opened Workspace
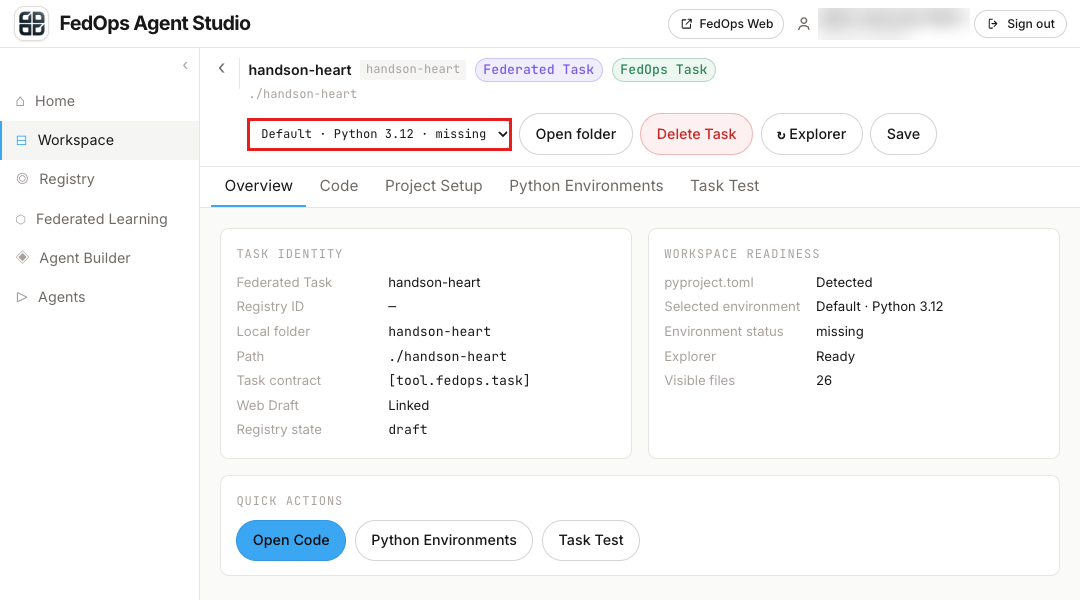
The handson-heart Workspace opens. The Python environment is still missing.
The Workspace name later becomes the Tool id. For
handson-heart, the Tool id islocal:handson-heart.
Do not press tab 1 (Python Environments) yet. The dependency file changes in the next step, so sync after adding the template to finish in one go.
⚙️ Options explained — three sources for opening a Workspace
The tabs of the Start a Federated Task Workspace window are “where you start from”.
| Tab | What | Who |
|---|---|---|
| My Web Draft | A Task I created in the Console (not yet published) | Owner — this tutorial |
| Joined Registry Task | Someone else’s Task I was approved to join | Client (Client Track ch. 2) |
| (other tabs) | Paths to bring in existing code | Not used in this tutorial |
2) Put in the template files (Finder)
Drag files from the template folder into the Workspace folder. It is easiest with two Finder windows side by side.
① Open the Workspace folder
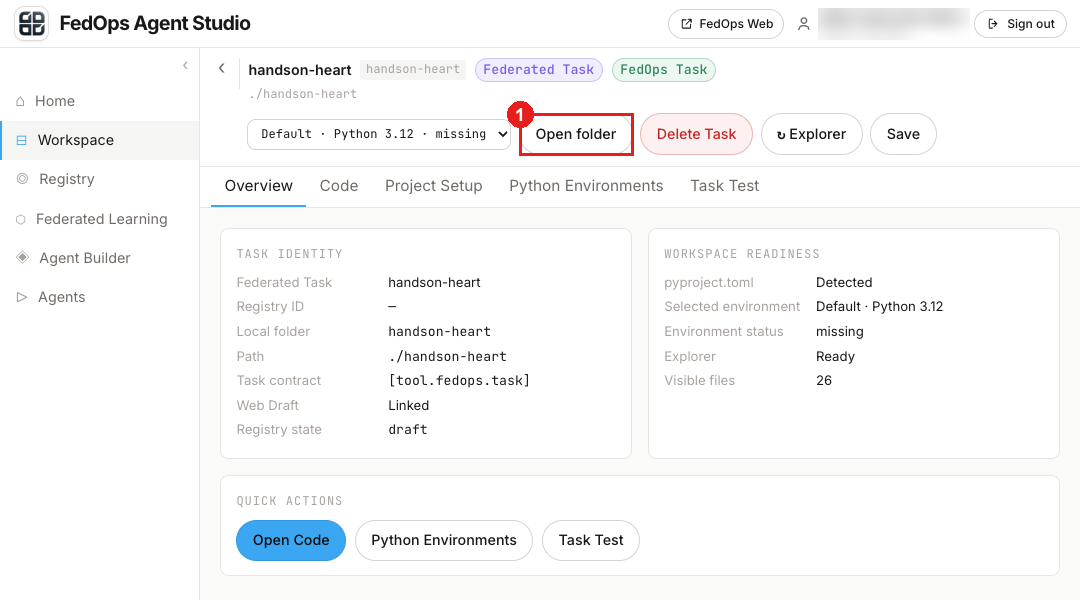
- Click Open folder at the top of the Studio Workspace. Finder opens the Workspace folder (
handson-heart).
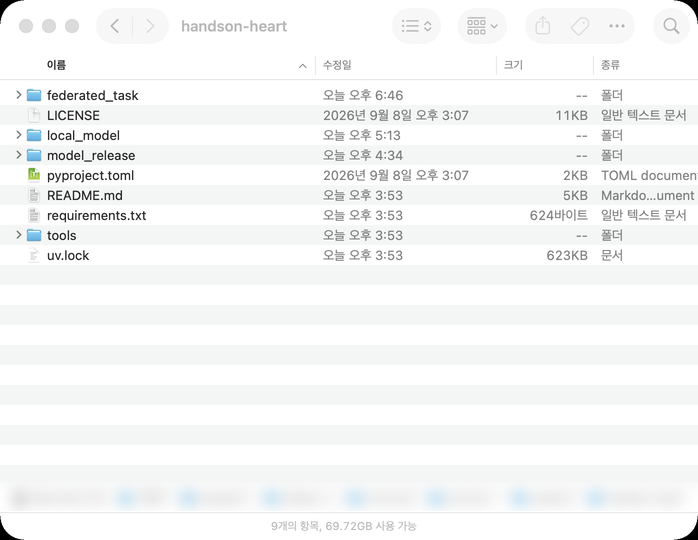
When the Workspace folder opens as above, open a new Finder window (⌘N) and go to the downloaded guide’s FedOps-hands-on-guide/template/federated-task folder. Put the two windows side by side: template on the left, Workspace on the right.
Do not drag the whole
federated_taskfolder. Finder replaces a folder with the same name entirely, so files FedOps manages (main.py,federated_learning/, etc.) disappear. As in ㉠–㉤ below, pick only the files and put them into the subfolder of the same name.
In each picture, 1 = files to pick in the left window, 2 = where to drop them in the right window. If a dialog says a file with the same name exists, click Replace (대치 on a Korean macOS).
㉠ README.md, requirements.txt → top of the Workspace
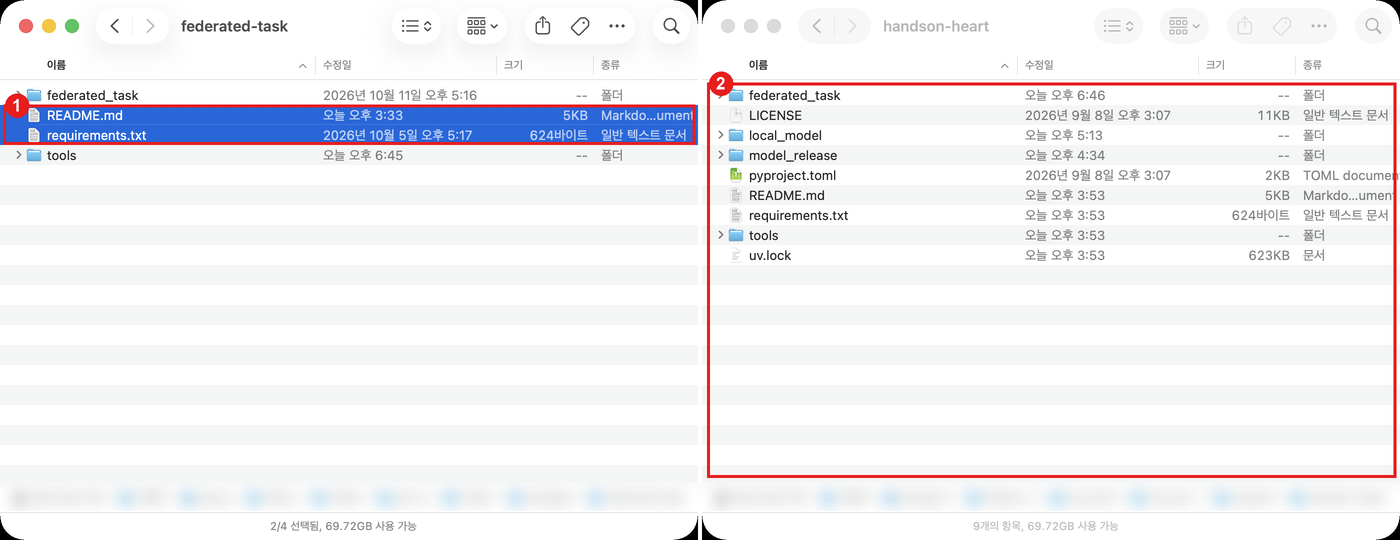
- In the left window (
federated-task), selectREADME.mdandrequirements.txt(⌘-click). - Drag them onto an empty area of the right window (
handson-heart).
㉡ config.yaml → federated_task/conf
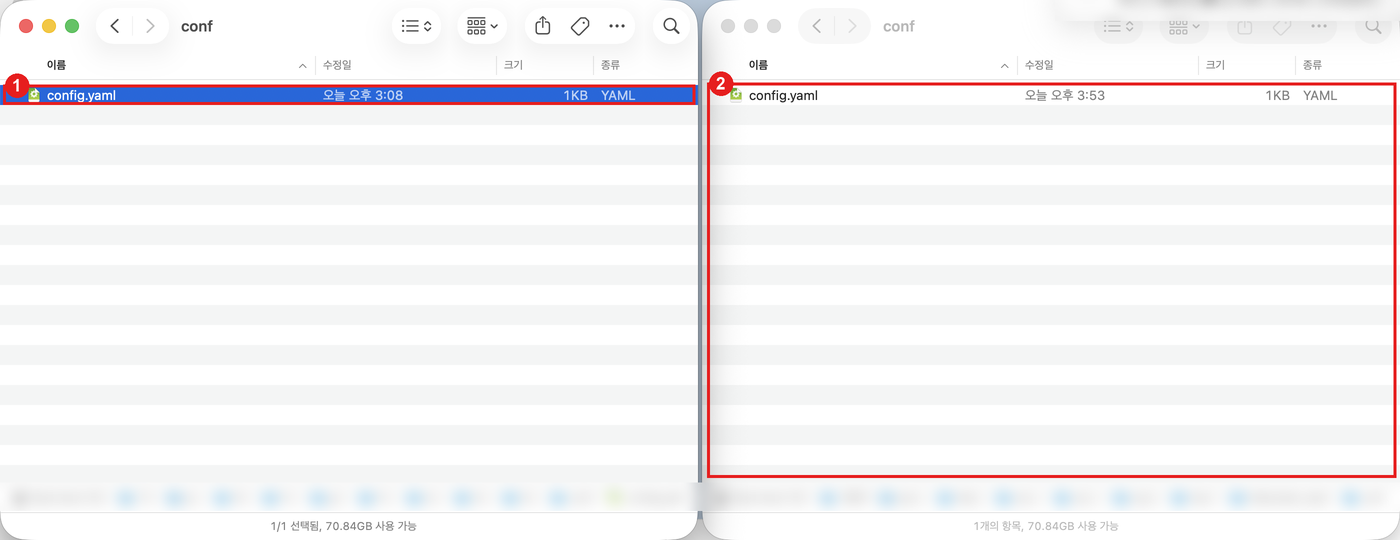
- On the left, go into
federated_task→confand selectconfig.yaml. - On the right, also go into
federated_task→confand drop it there.
㉢ The 5 .py files in local_training → federated_task/local_training
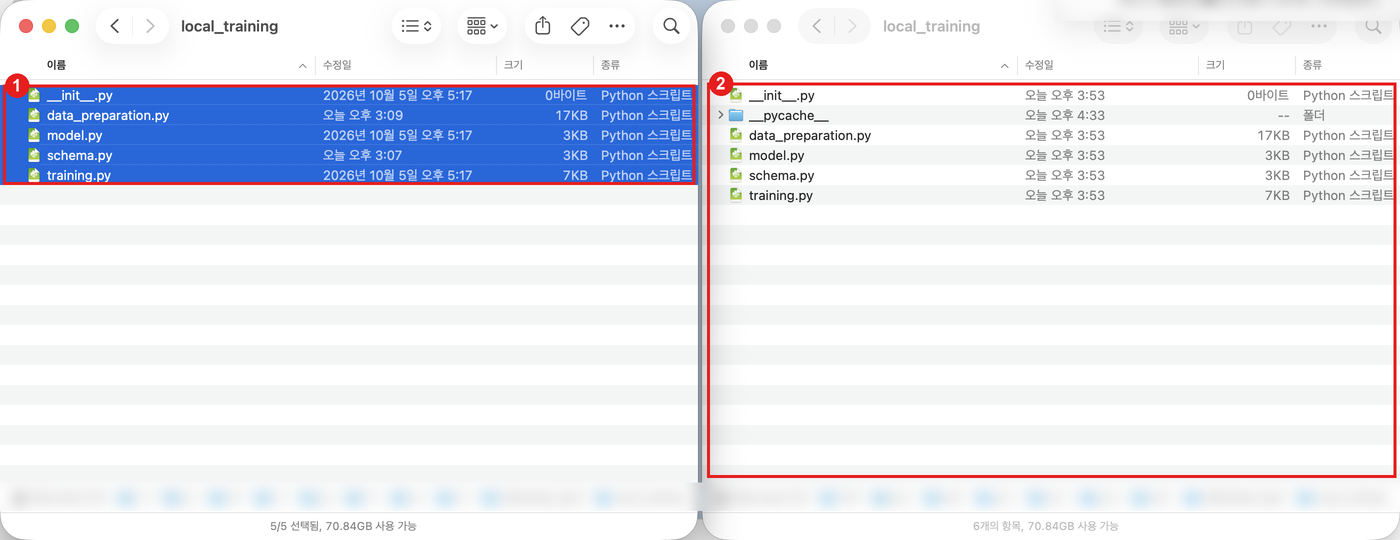
- On the left, select all 5
.pyfiles infederated_task→local_training. - Drop them into
federated_task→local_trainingon the right.
㉣ manifest.json, tool.py → federated_task/tool_ai
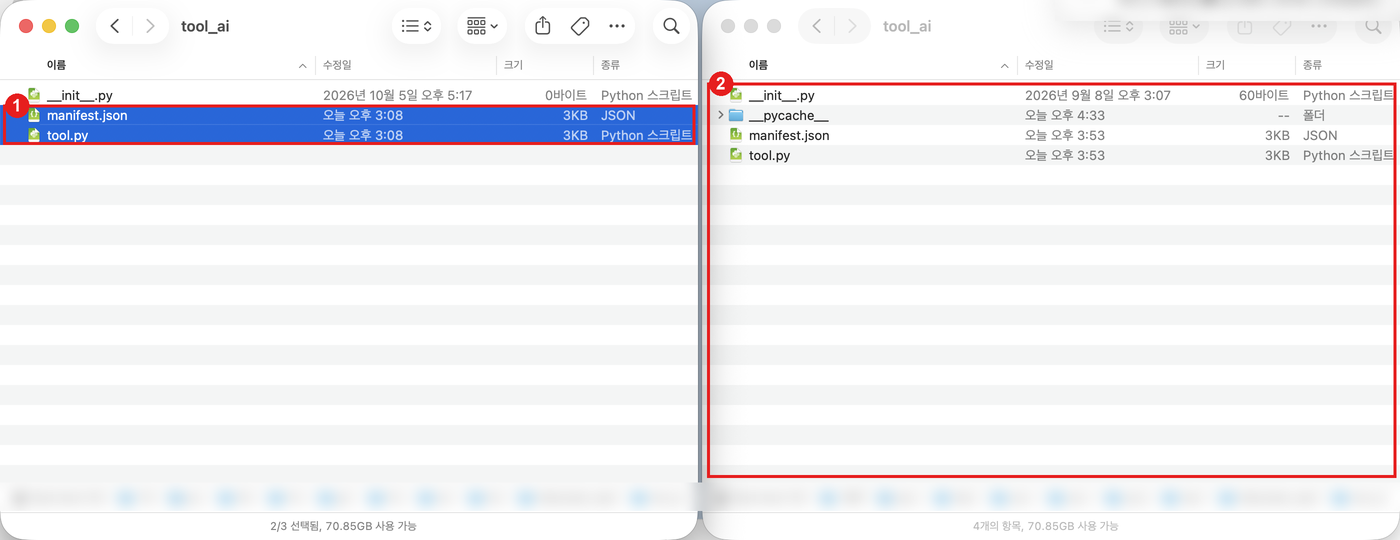
- On the left, select
manifest.jsonandtool.pyinfederated_task→tool_ai. - Drop them into
federated_task→tool_aion the right.
㉤ tools folder → top of the Workspace
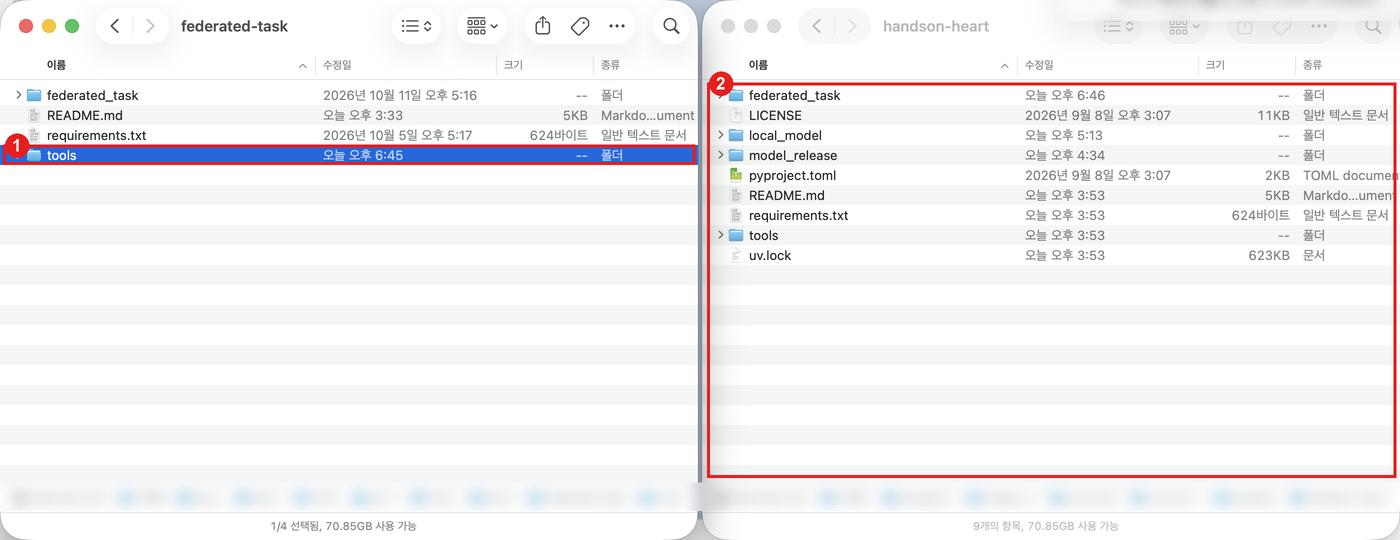
- On the left, at the top (
federated-task), select thetoolsfolder. - Drop it at the top on the right (
handson-heart). (The Workspace has no such folder, so dropping the whole folder is fine.)
Do it all at once in the terminal (same result)
Run from the template/ folder.
ls -d federated-task  # 'No such file' means you are not in template/
WS=$(echo ~/fedops-workspace/accounts/*/projects/handson-heart)
ls -d "$WS"          # must print one path
cd federated-task
cp README.md requirements.txt "$WS"/
cp federated_task/conf/config.yaml     "$WS"/federated_task/conf/
cp federated_task/local_training/*.py  "$WS"/federated_task/local_training/
cp federated_task/tool_ai/manifest.json federated_task/tool_ai/tool.py "$WS"/federated_task/tool_ai/
mkdir -p "$WS"/tools && cp tools/embed_preprocessing.py "$WS"/tools/
cd ..
On Windows, put them in the same way with File Explorer, or open the same files in Studio’s Code tab and paste their contents.
federated_learning/, runtime/, task_readiness/, main.py, pyproject.toml, and uv.lock are managed by FedOps; do not touch them.
3) Install the Python environment (Sync)
① Python Environments tab
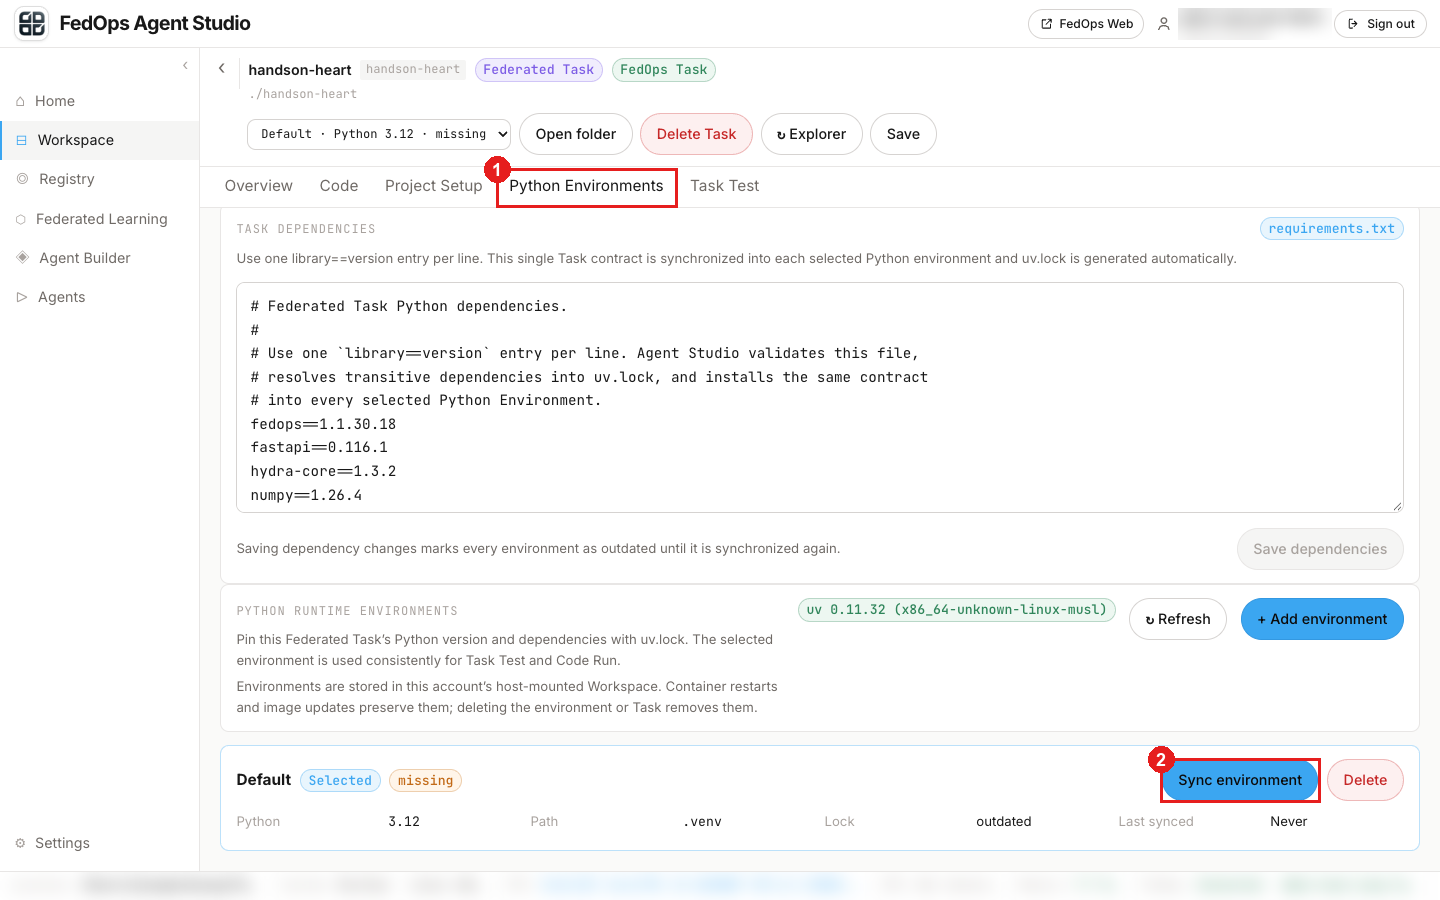
- Click the Python Environments tab.
- Scroll down and click Sync environment for the Default environment.
② In progress
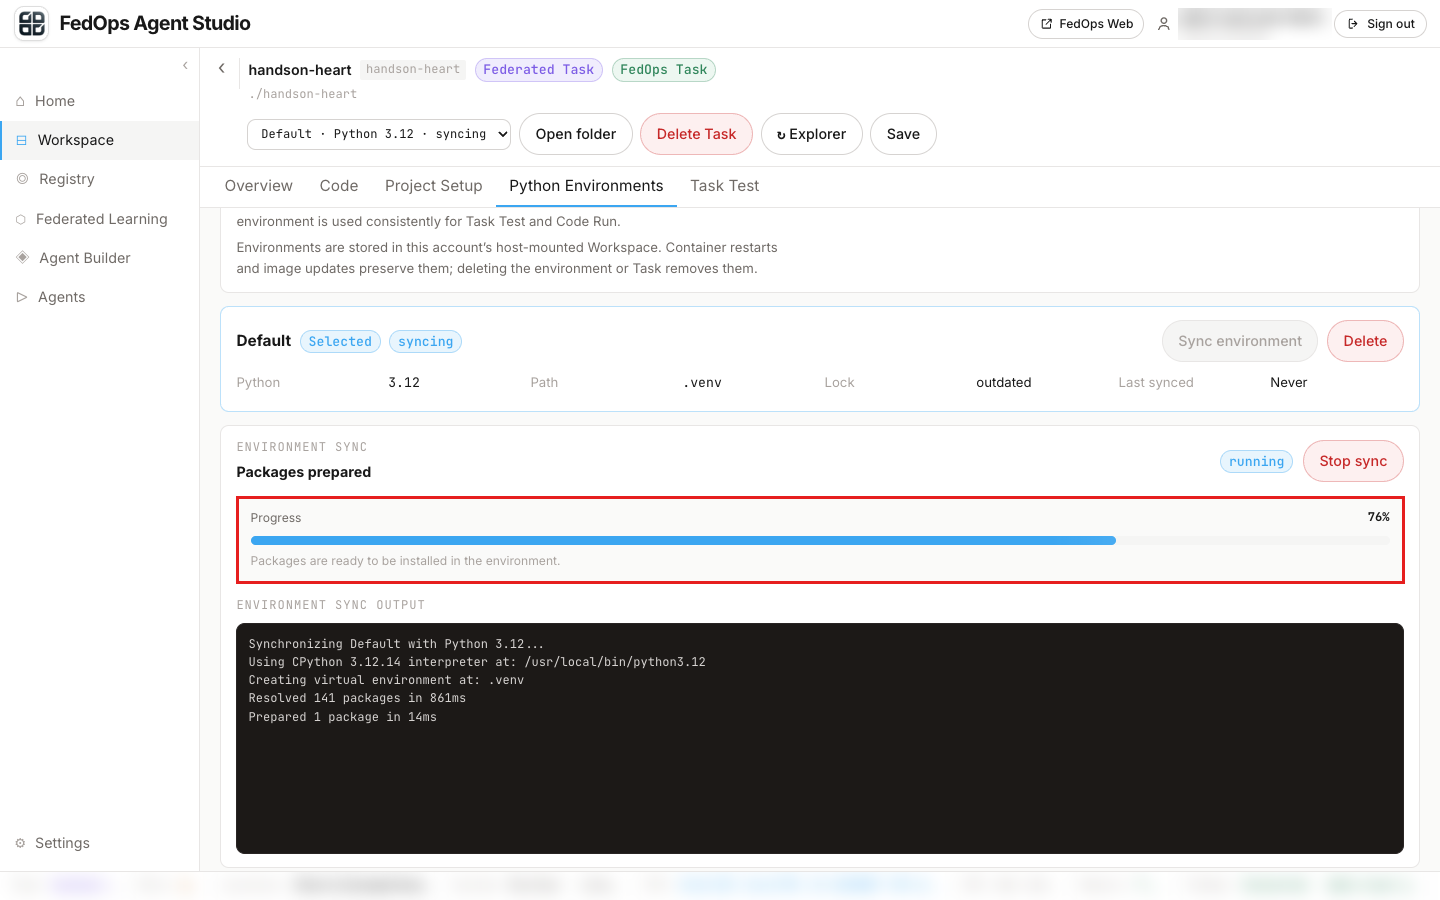
It takes close to 10 minutes to download torch and more (measured 2026-10-20 on a Mac: 128 packages installed in 9 min 20 s). It looks stuck at 76% for a long time, but it is installing packages, so wait.
③ Done
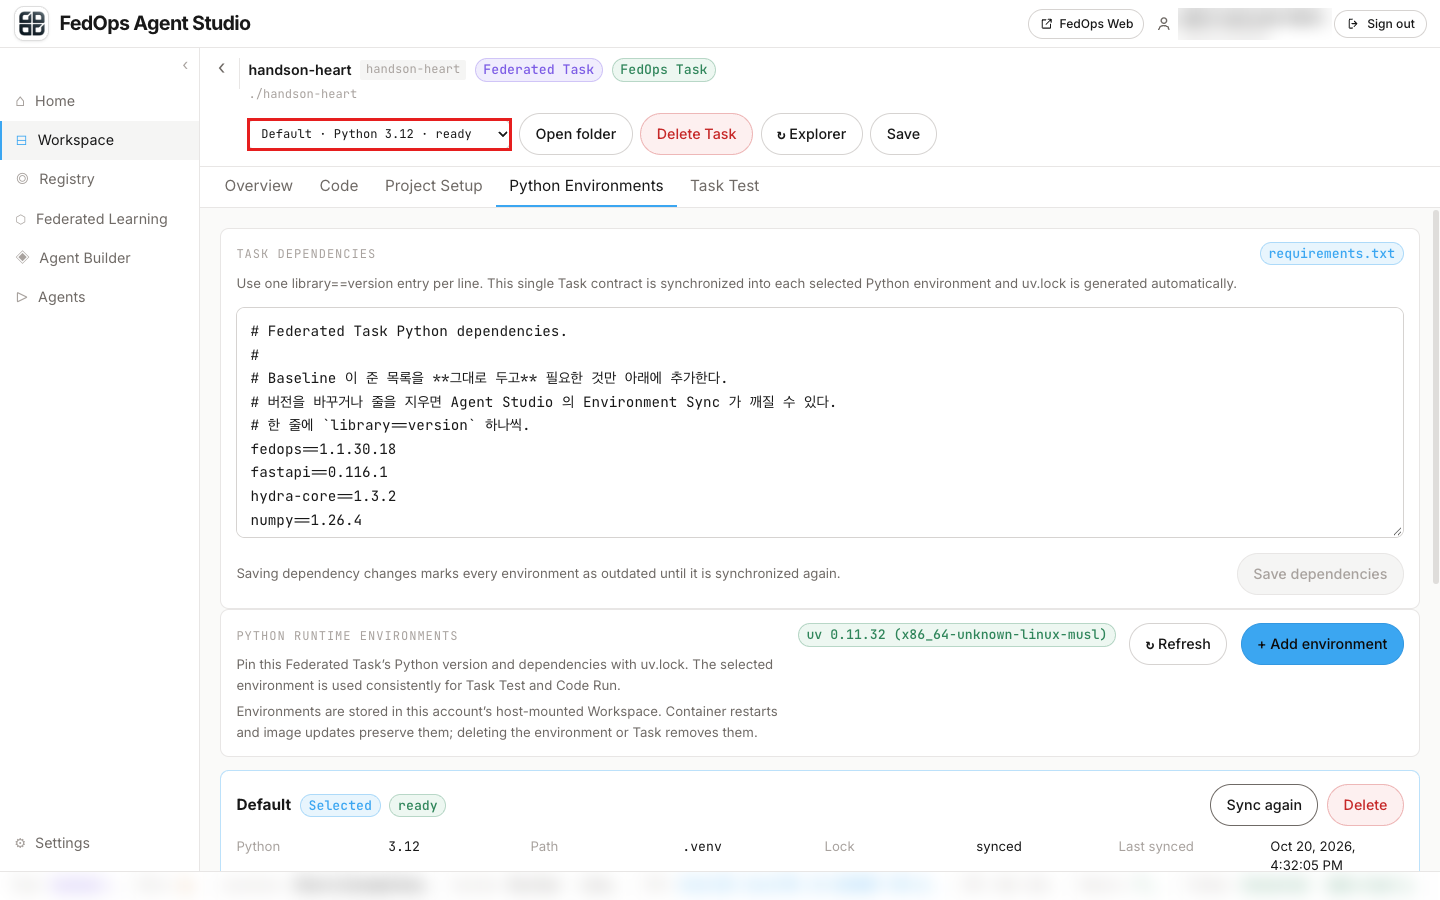
Done when the environment indicator at the top changes to Default · Python 3.12 · ready.
Why this is needed: the training code runs in a separate Python environment inside the Studio container. Sync installs the packages listed in
requirements.txt(torch, etc.) into that environment. Clients do the same Sync before joining, so that every participant trains with the same package list.
4) Place the Owner’s data
① Task Test tab
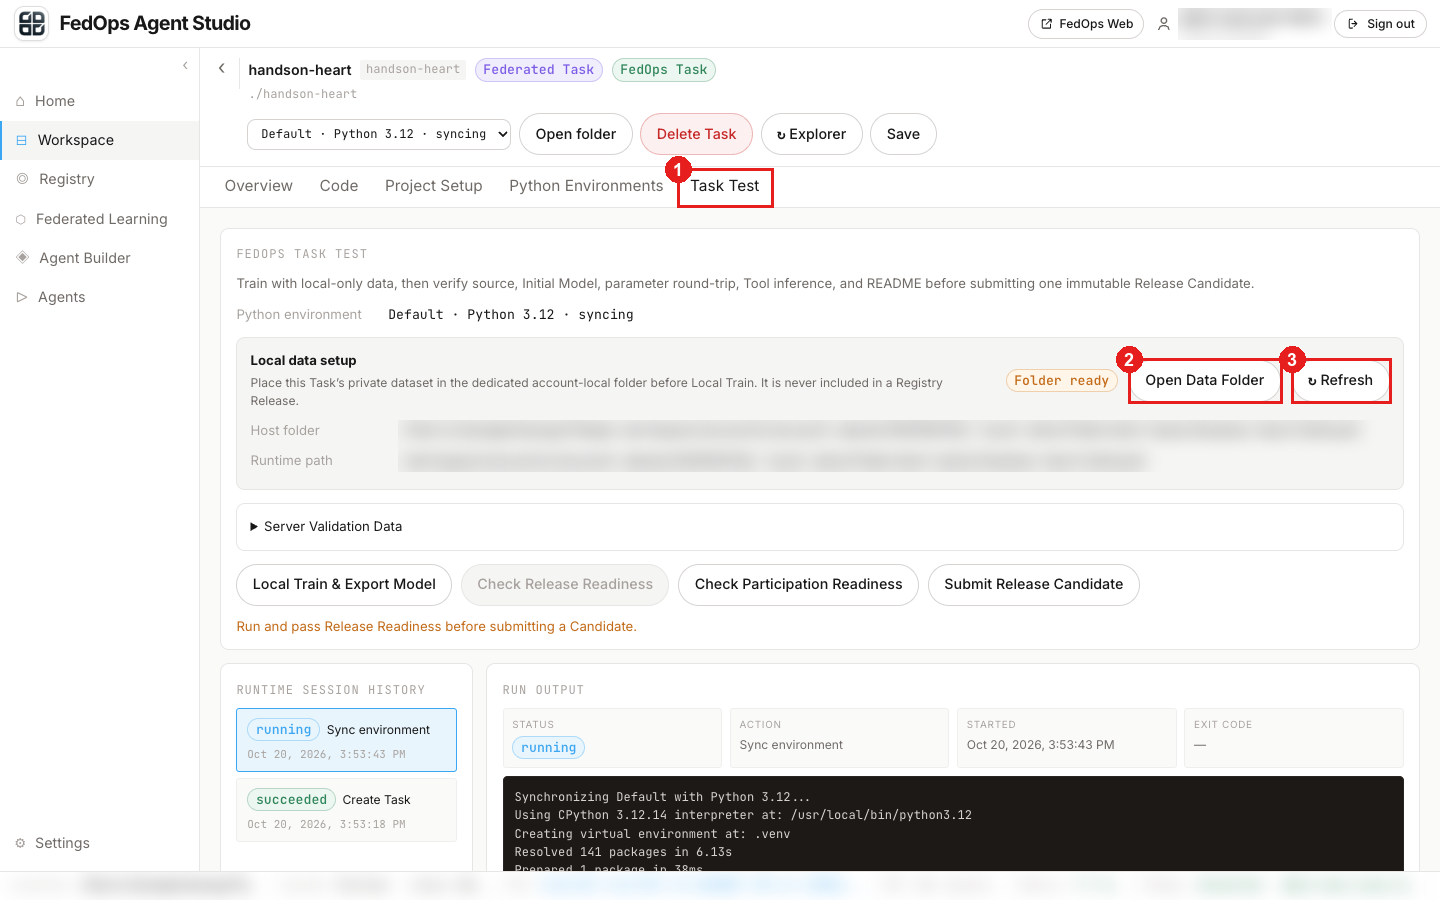
- Click the Task Test tab. Local data setup shows
Folder ready. - Click Open Data Folder to open the data folder. Put
data/out/hungarian/dataset.csvfrom chapter 1 there, keeping its name. In the terminal, from thetemplate/folder:cp data/out/hungarian/dataset.csv ~/fedops-workspace/accounts/*/.local-data/federated-tasks/handson-heart/dataset/ - After placing the file, click Refresh.
② Detected
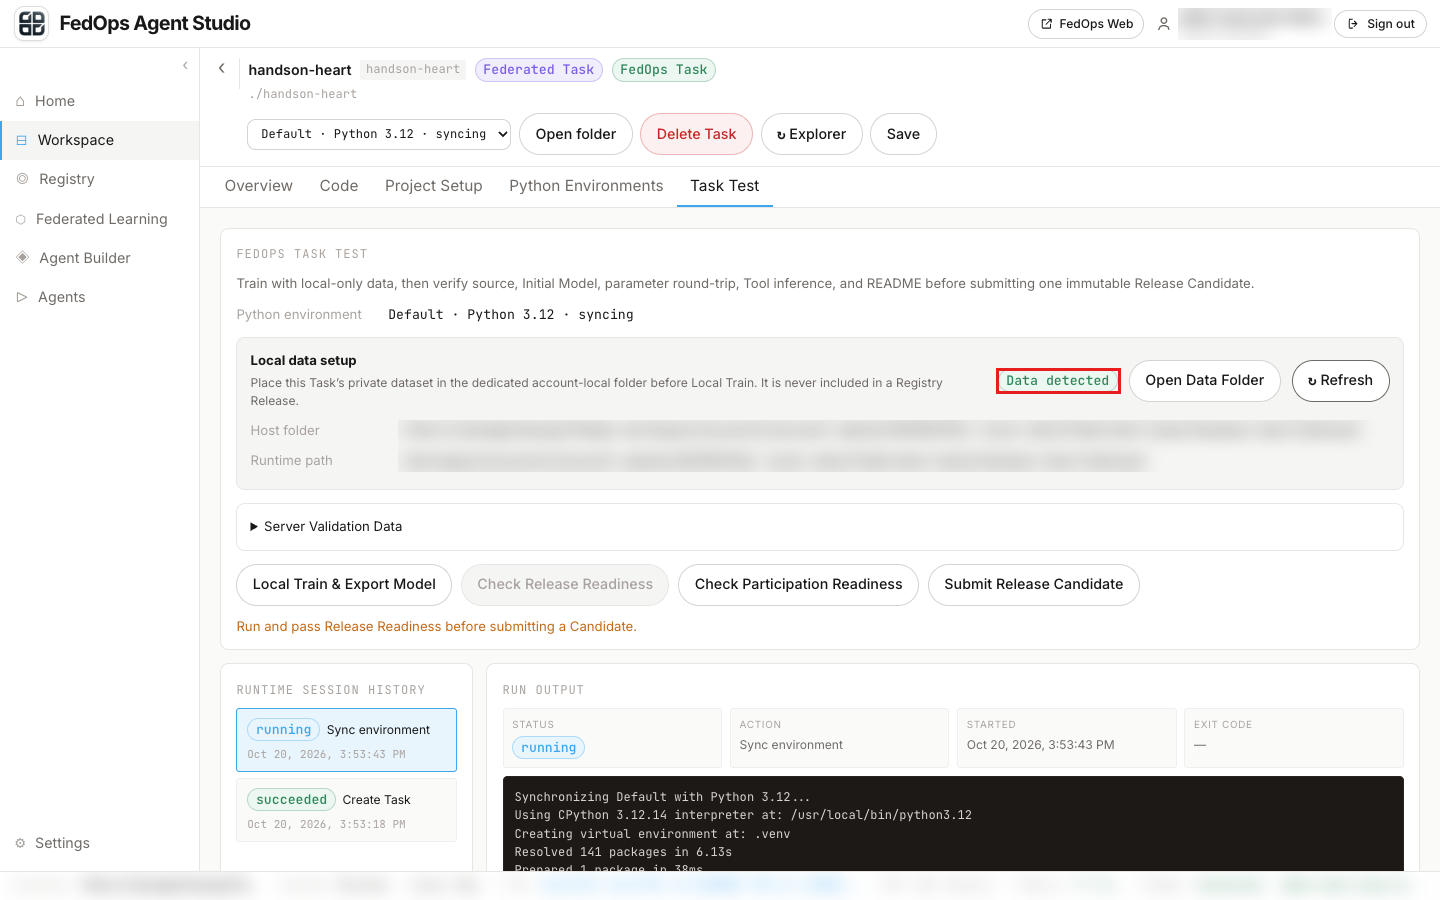
Done when Folder ready changes to Data detected. The file name must be exactly dataset.csv, not inside a subfolder.
Local data is not uploaded anywhere. Only code and models go to the Registry.
Why does the Owner place data? Training the first model (Initial Model) in chapter 4 and checking with real data that the code keeps its agreement both need data. In this tutorial the Owner is also the Hungarian hospital. An Owner with no data at all sometimes builds the first model from public or synthetic data.
5) Fixing preprocessing statistics — already done
The template’s data_preparation.py already contains preprocessing statistics computed on the Hungarian data. If you follow this tutorial as is, you do not need to do anything. If you changed the data, the Owner re-fixes them once in the Workspace.
python tools/embed_preprocessing.py --data-root <Data Folder>
Clients do not run this command. Running it changes the code so it no longer matches the published Release, and the same patient becomes different numbers at each hospital before entering the model.
📚 Federated learning background — the data format is part of the agreement
In federated learning neither the server nor the Owner can see the Clients’ data. So the agreement that every Client places data in the same format must be in the code. In this template, three places hold that agreement.
| File | Agreement |
|---|---|
local_training/schema.py | 10 column names (8 numeric + categorical cp and restecg), allowed values per category, target column target, class names no_disease and disease |
conf/config.yaml | Input size 10, output size 2, model display name Heart Disease MLP |
tool_ai/manifest.json | Input names and categorical values the Agent puts into the Tool |
If a Client’s CSV does not match this agreement, it is caught by the participation readiness check (Readiness). Clients read the agreement in the README in the Registry.
✅ Checklist
- The template files are in the Studio Workspace
- The Python environment is
ready - Task Test shows
Data detected
To switch to your own data and model
- Change feature names, categorical values, and class names in
local_training/schema.py - Match
model.input_size/output_size/display_nameinconf/config.yaml - Match
featuresandoutput.labelsintool_ai/manifest.json - Put your CSV in the Data Folder
- Always re-run
python tools/embed_preprocessing.py --data-root <folder>(fix the preprocessing statistics)
If the three files (schema.py, config.yaml, manifest.json) disagree, Local Train or the Readiness check in the next step will catch it.
If something goes wrong
| Symptom | Fix |
|---|---|
Open folder shows the warning The host folder opener refused the connection | When Studio came back up after a Docker restart, the host program that opens folders did not start with it. In the terminal: fedops run agent-studio --repair-host (Studio is not restarted) |
cp: ... Not a directory | Check that you used the WS=$(echo ...) form and ran from the template/ folder. If you named the Workspace differently, change the path too |
| My Web Draft list is empty | Check that you created the Task in the Console and that Studio and the Console use the same account |
| Sync fails | Check whether you deleted default lines or changed versions in requirements.txt |
Studio stops responding during Sync, then Local Train fails with No module named 'torch._utils' | Docker froze during Sync and torch was only half installed (happened on a Mac on 2026-10-20). Sync again does not fix it. Restart Docker Desktop, Delete the Default environment in Python Environments, then click Sync environment again (code and uv.lock remain) |
Folder ready stays after Refresh | Check that the file name is dataset.csv and it is not inside a subfolder |
고정 전처리가 아직 설정되지 않았다 (fixed preprocessing is not set yet) | Run tools/embed_preprocessing.py |