
1. Build an AI Agent
📍 Where you are: Model Use 1/3 — ① Agent → ② Serving API → ③ App
Screen: Agent Studio (Agent Builder) · Next: open the built Agent as an API
🎯 What you do in this step: Combine the model built by federated learning as a Tool AI with a Base LLM that writes sentences, attach rules for the LLM (Harness), and build an Agent. A user asks “이 환자 기록의 판정 결과를 설명해줘” (explain the result for this patient record), and the Agent answers based on the numbers from the model.
Red boxes + numbers in the pictures are where to click, matching the numbers in the text. Agent Builder is wide, so these screenshots are taken 1440 px wide.
- 1) Create an Agent draft
- 2) Choose the Tool AI (Models tab)
- 3) Choose the Base LLM
- 4) Agent Harness (rules)
- 5) Test (Test & Build tab)
- 6) Validate and build
- ✅ Checklist
- If something goes wrong
- Next
1) Create an Agent draft
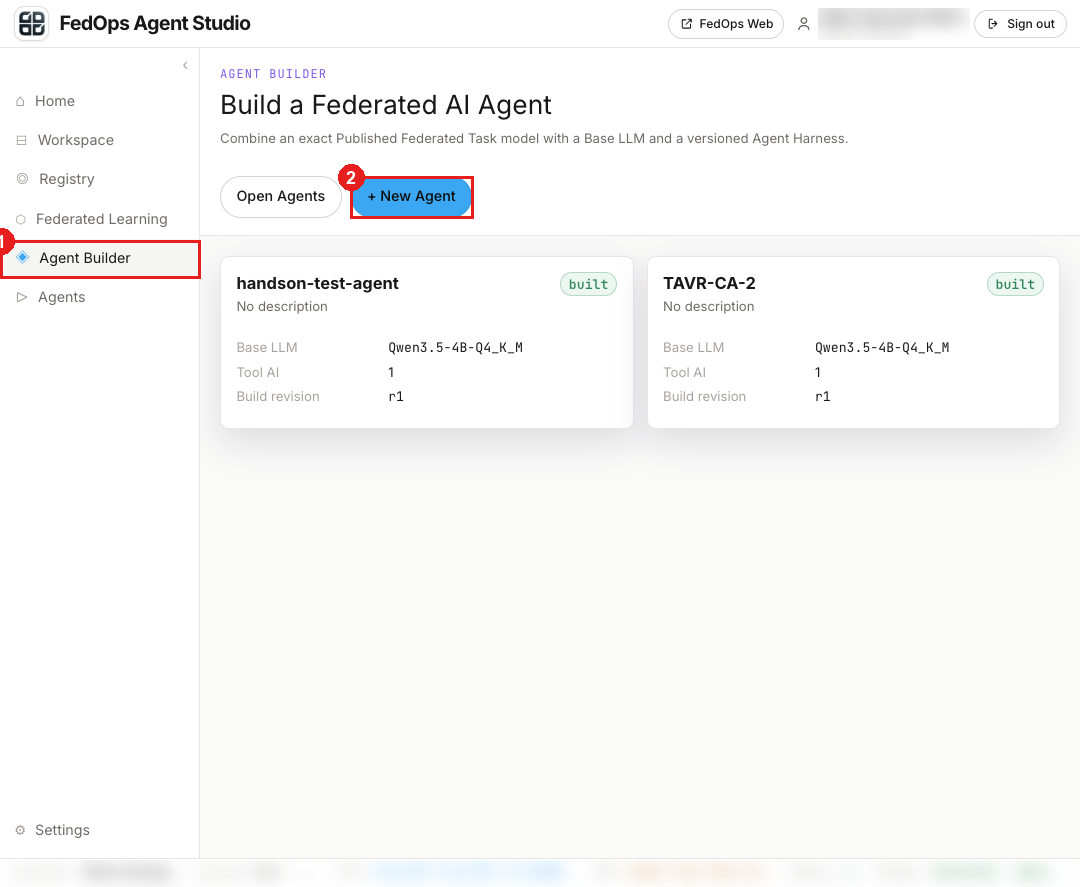
- Click Agent Builder in the left menu.
- Click + New Agent.
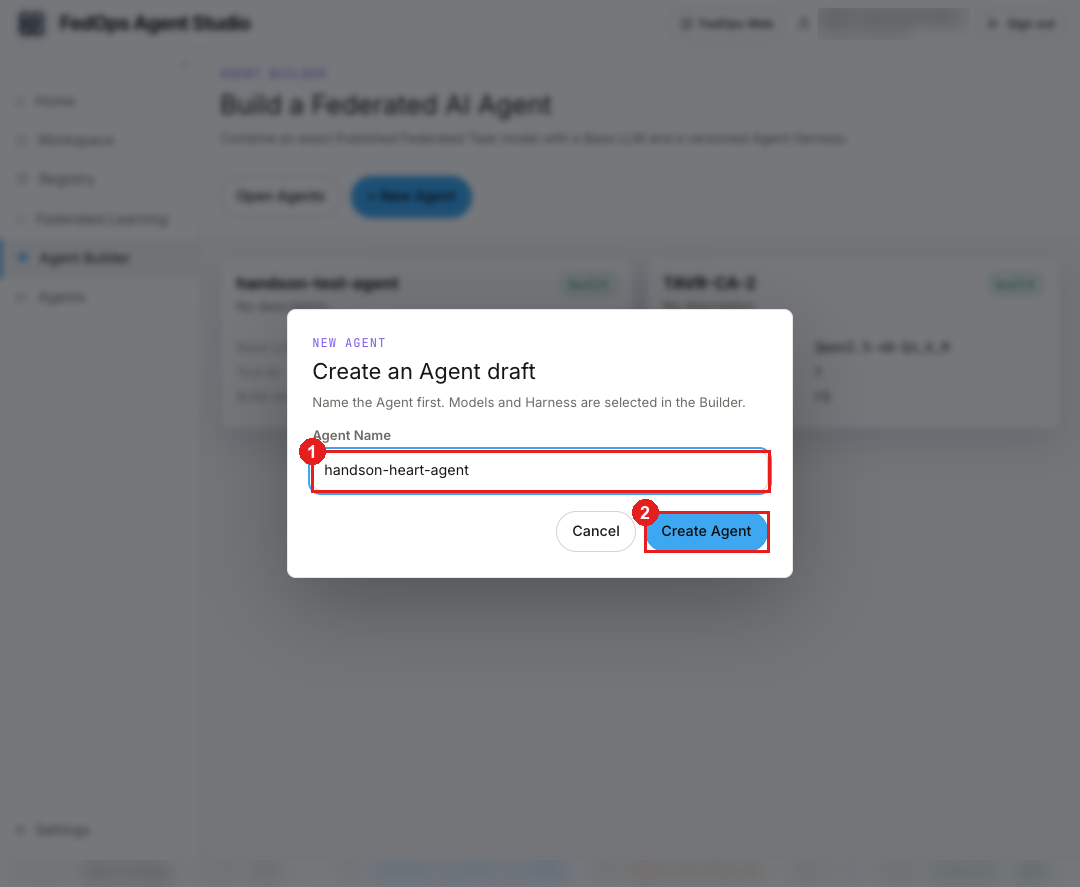
- Enter
handson-heart-agentas the Agent Name. - Click Create Agent.
If a draft with the same name already exists, you get An Agent draft with this name already exists. See the “If something goes wrong” table below.
2) Choose the Tool AI (Models tab)
It is easier to choose the Tool AI first and the Base LLM later. Choosing the Tool AI sometimes requires refreshing the screen, which drops an unsaved Base LLM choice.
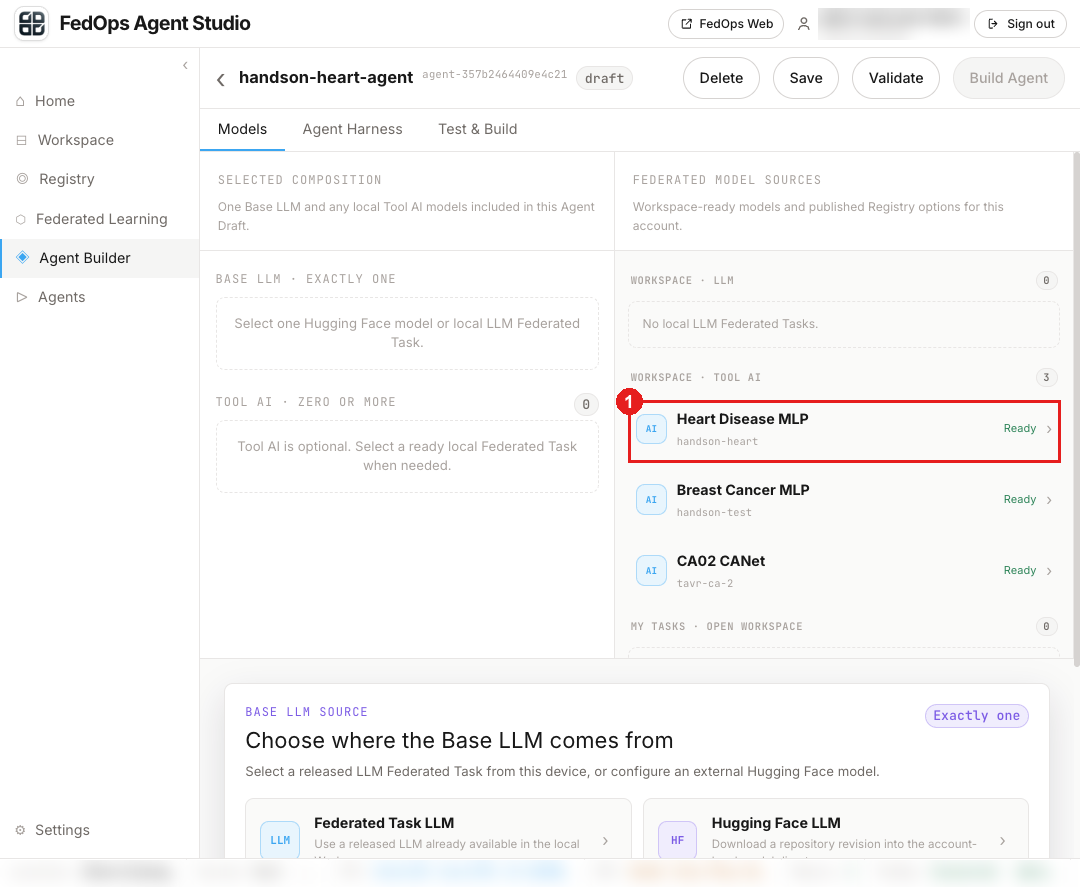
- Click Heart Disease MLP in the WORKSPACE · TOOL AI list in the middle.
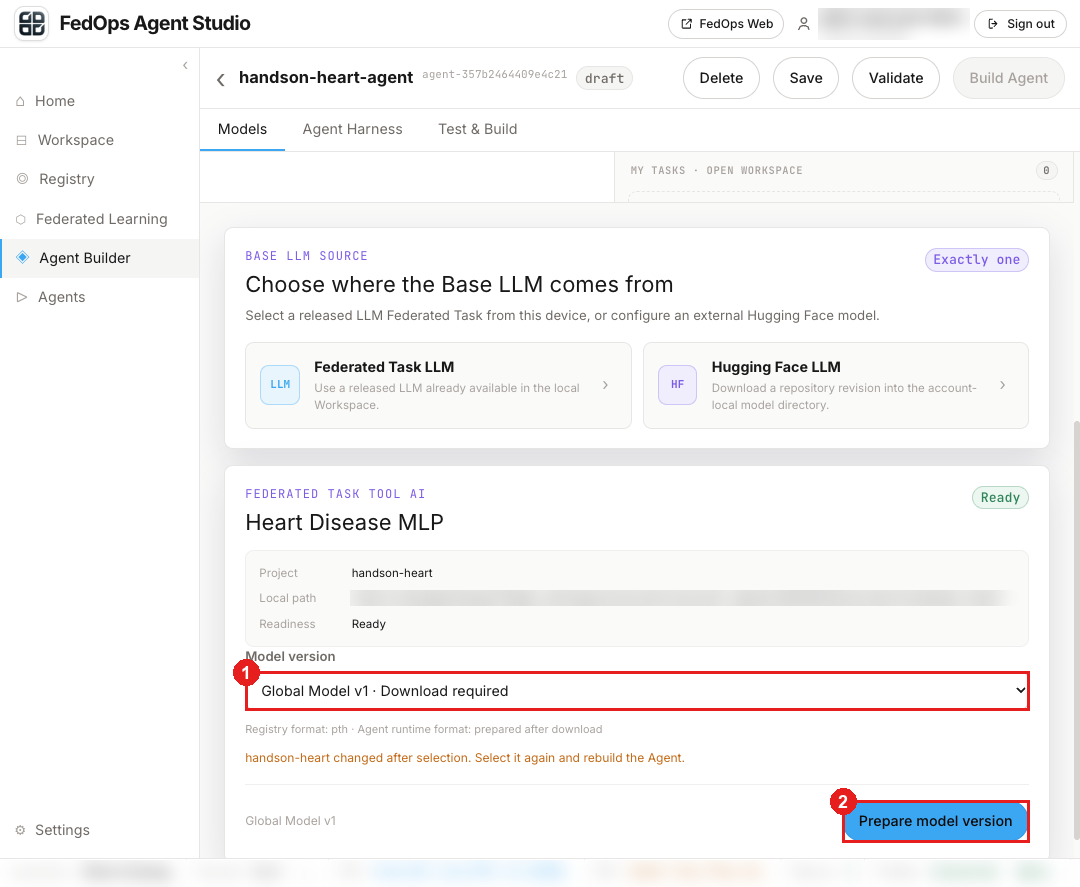
If you ran federated learning, use Global Model v1. At first it shows as Download required.
- In Model version at the bottom right, choose
Global Model v1 · Download required. - Click Prepare model version.
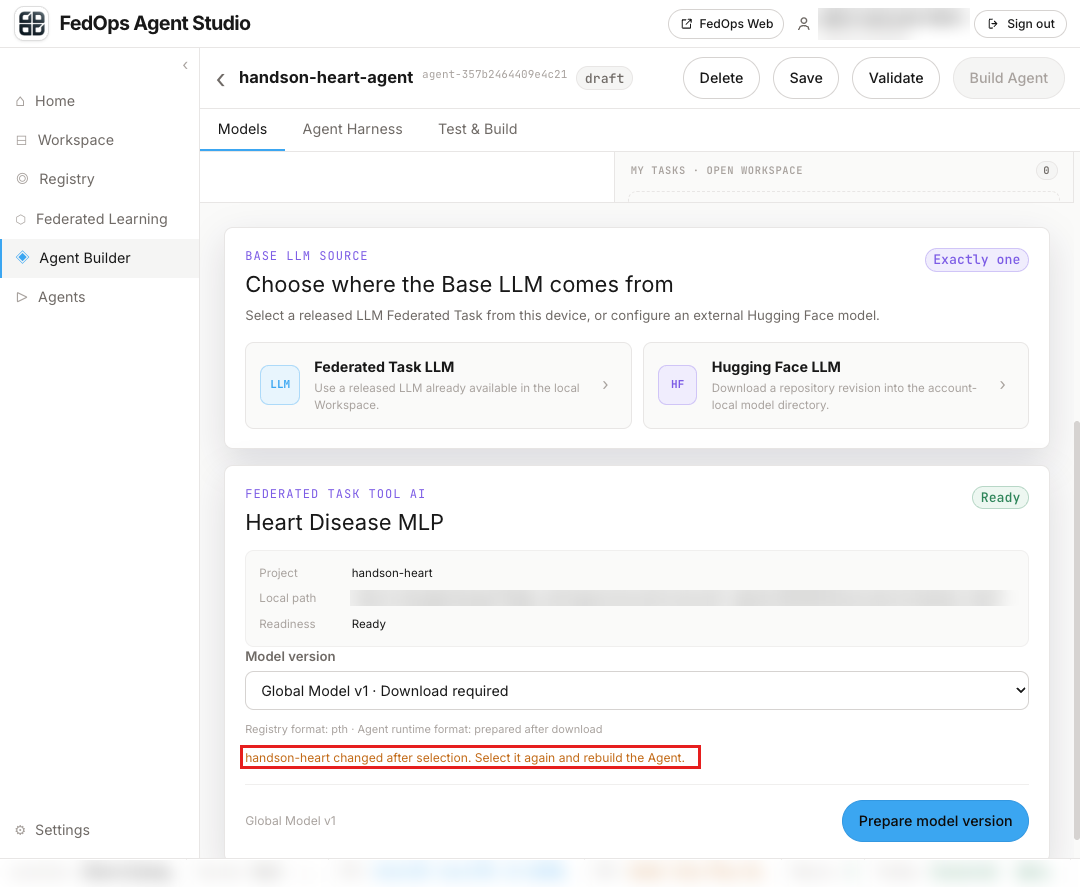
You get handson-heart changed after selection. Select it again and rebuild the Agent. (still the case on 2026-10-20). It is not broken; the model has already been downloaded. Refresh the browser, then click Agent Builder → the handson-heart-agent draft → Heart Disease MLP again.
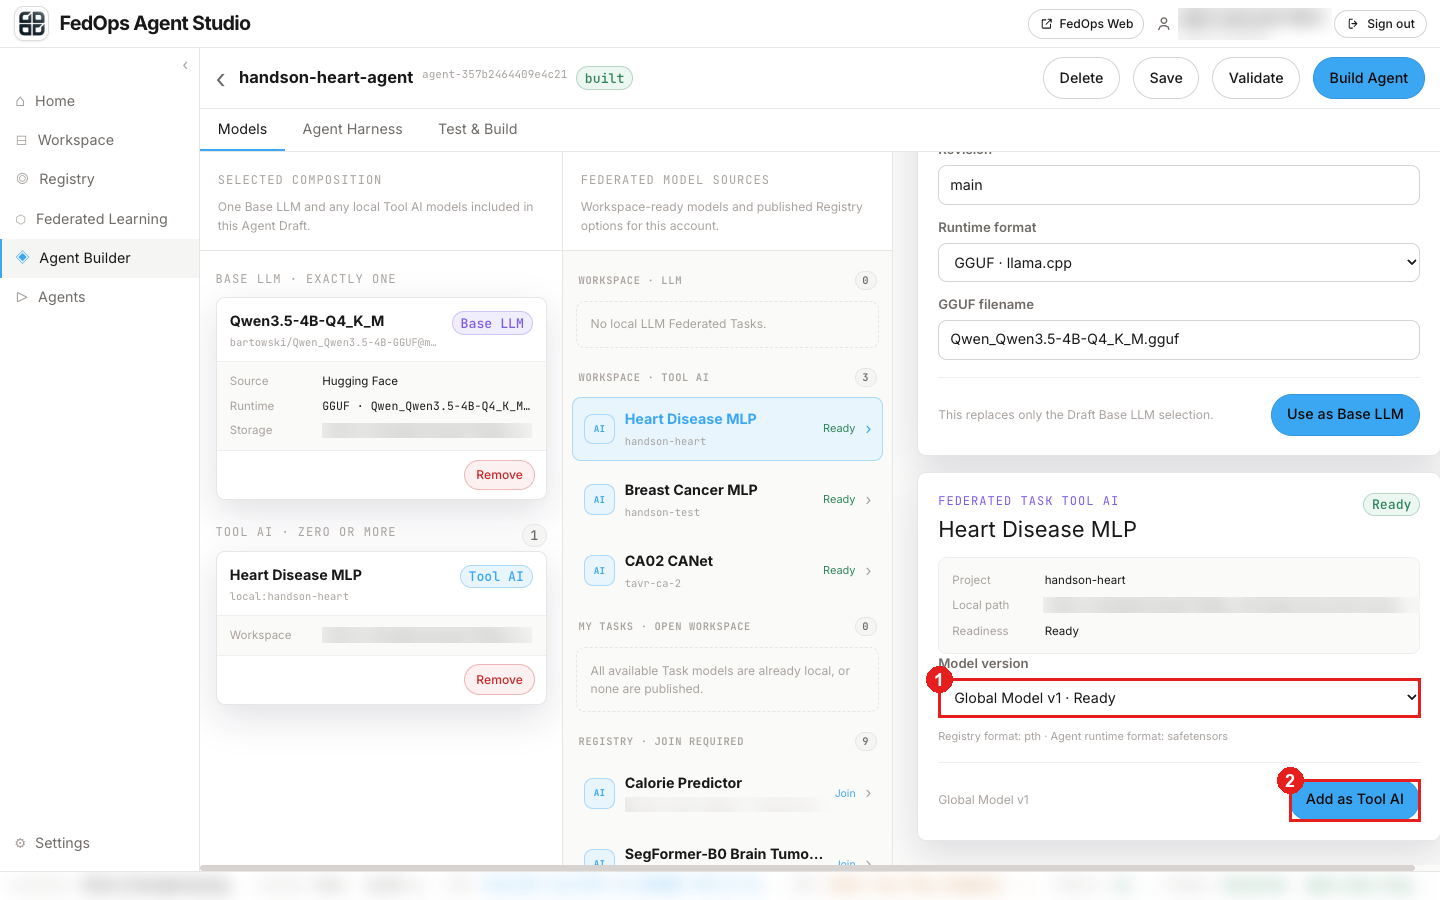
- After the refresh it shows
Global Model v1 · Ready. Choose it. - Click Add as Tool AI.
If you skipped federated learning, keep
Initiative Model · Readyand click Add as Tool AI.
⚙️ Explained — which model version to use as the Tool
| Version | What | When |
|---|---|---|
Initiative Model | The first model the Owner built alone on Hungarian data (Owner Track ch. 4) | When you skipped federated learning |
Global Model v1, v2, … | Federated learning results | This tutorial’s choice — the model reflecting both hospitals’ data |
Download required means that version is not on your PC yet, and Prepare model version fetches it from the server. Building the Agent pins the version at that moment, so even when v2 appears later, the Agent keeps using v1 until you choose it again and rebuild.
3) Choose the Base LLM
Heart Disease MLP is now in the TOOL AI slot on the left.
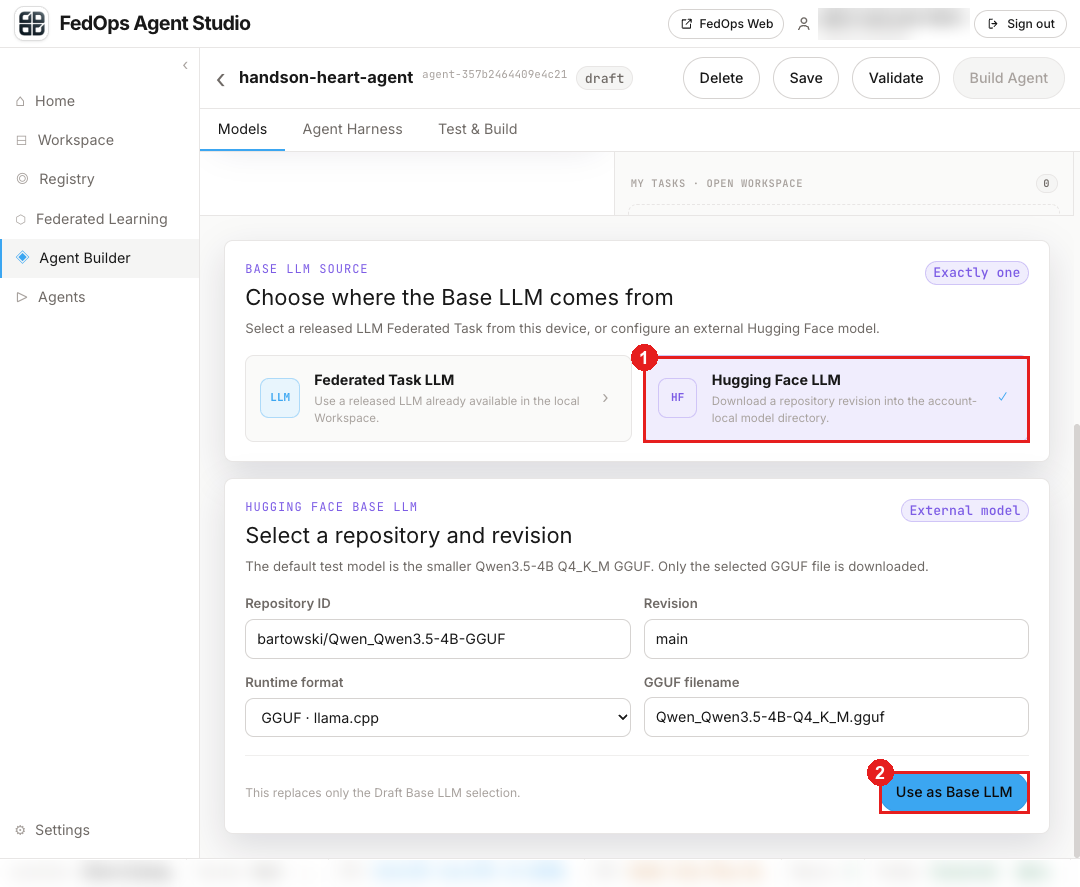
- Click Hugging Face LLM under BASE LLM SOURCE on the right.
- Keep the values below as defaults (
bartowski/Qwen_Qwen3.5-4B-GGUF,main,GGUF · llama.cpp,Qwen_Qwen3.5-4B-Q4_K_M.gguf) and click Use as Base LLM.
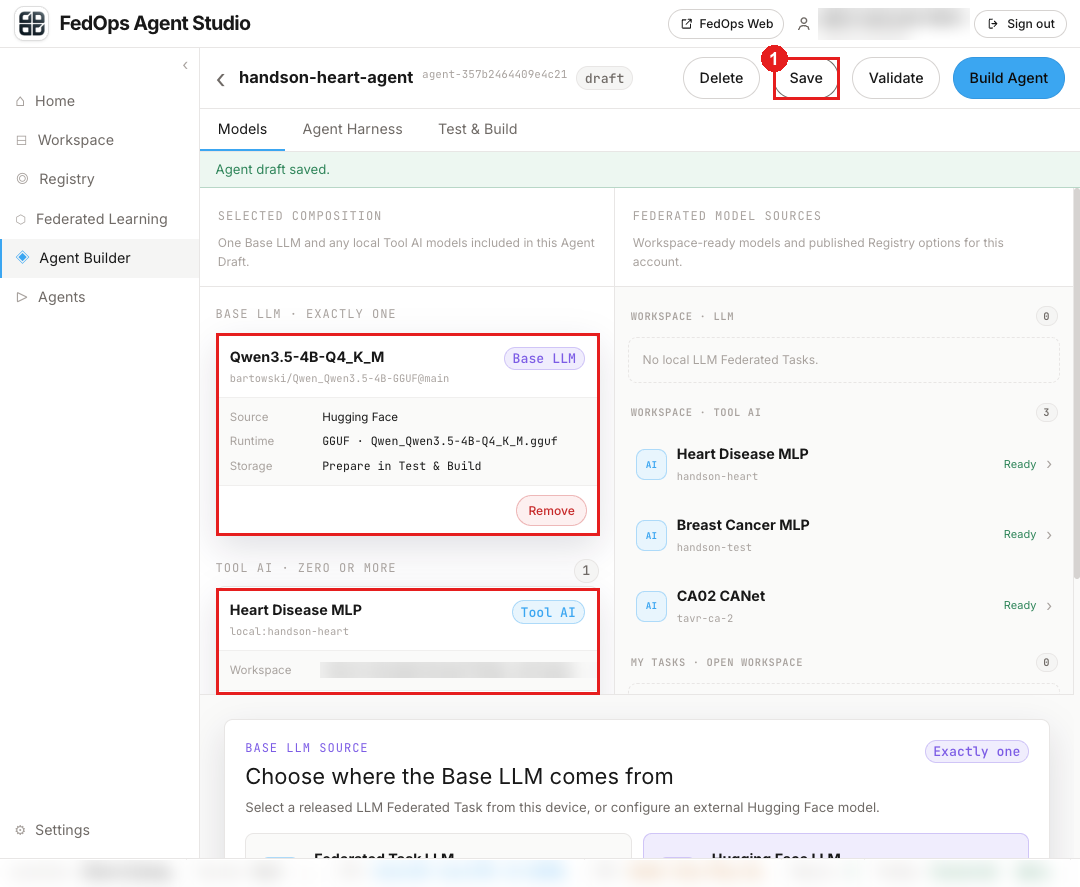
One Base LLM and one Tool AI are now on the left.
- Click Save at the top.
Agent draft saved.appears.
Be sure to click Save. Refreshing without saving drops the Base LLM choice.
⚙️ Explained — Base LLM fields
| Field | Default | Meaning |
|---|---|---|
| Repository | bartowski/Qwen_Qwen3.5-4B-GGUF | Model repository on Hugging Face. A small LLM with 4 billion (4B) parameters |
| Revision | main | Version of the repository |
| Format | GGUF · llama.cpp | A compressed format and runtime suited to CPUs |
| File | Qwen_Qwen3.5-4B-Q4_K_M.gguf | File reduced to 4 bits (about 2.8 GB) |
Why a small LLM: Studio runs on a laptop CPU. A large LLM takes tens of minutes per answer or runs out of memory. In this Agent the LLM does not judge; it only explains the numbers the Tool gives, so a small model is enough. In exchange it sometimes breaks the rules (section 5 below).
4) Agent Harness (rules)
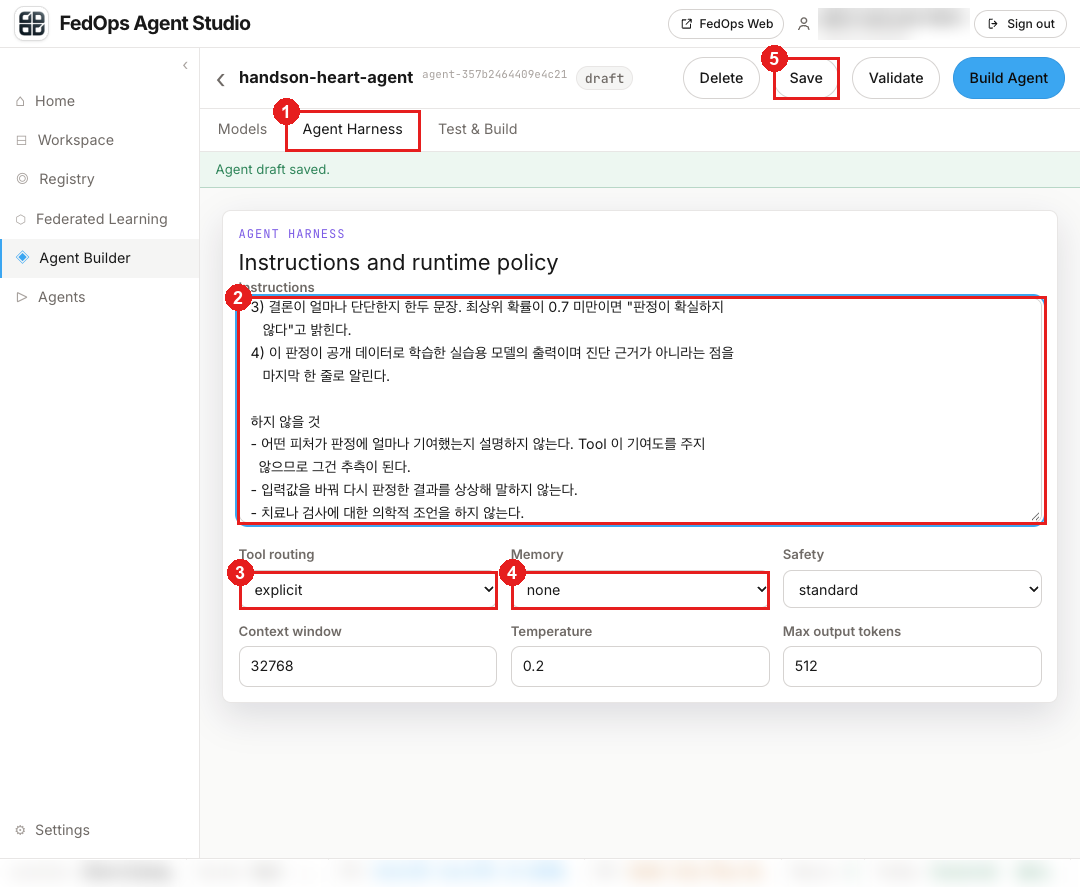
- Click the Agent Harness tab.
- Delete the default text in the Instructions box and paste the contents of the template’s
template/agent/harness-instructions.txt. - Change Tool routing to
explicit. - Change Memory to
none. - Click Save.
Keep Temperature 0.2 and Max output tokens 512 as defaults.
The Harness’s core rules: quote the Tool’s numbers as is and never invent new ones. Do not convert to percentages (%). Write both class probabilities on one line in the form no_disease 0.316 / disease 0.684. Do not say which items influenced the result (the Tool does not provide that, so it would be a guess). Because this is medical data, state on the last line that it is not a basis for diagnosis, and give no treatment or test advice. (The Harness instructions in the template are written in Korean, so the Agent answers in Korean.)
⚙️ Options explained — Harness
| Option | Choices | What it decides | This tutorial |
|---|---|---|---|
| Instructions | Free text | The rules the LLM follows: answer format, what not to do | The template’s harness-instructions.txt |
| Temperature | Number ≥ 0 | Randomness of answers. Higher varies the wording, lower keeps it consistent | 0.2 — low because numbers must be copied exactly |
| Max output tokens | Number | Maximum answer length | 512 — a few sentences are enough |
| Context window | Number | How much the LLM can read at once (rules + question + Tool result) | 32768 (default) |
| Tool routing | automatic / explicit | A setting for when to call the Tool. Not used by the current Studio. In practice the Tool runs only when the request has input values, and if there is one Tool it is used | explicit (records intent) |
| Memory | session / none | A setting for remembering earlier conversation. Not used currently. Whether the conversation is remembered depends on the conversation history the caller sends (history, up to the last 40) | none (records intent) |
| Safety | standard / strict | Safety policy level. Not used currently | standard (default) |
What we found (2026-10-13). Tracing the code of the running Studio (2026-09-09 image), the only values used for LLM calls are Instructions, Temperature, Max output tokens, and Context window. Tool routing, Memory, and Safety are saved and shown on screen but do not change behavior. (Only when you pick a Federated Task’s LLM as the Base LLM are these values passed as is to that Task’s code.)
Measured: sending earlier conversation (
history) to an Agent with Memory set tononemade it answer with a word given earlier, and without the history it did not remember. So whether the conversation is remembered depends on whether the app sends history. The Tool runs only when the request has input values (input) (“Send without Tool” in chapter 3). So this tutorial treats these three values as “settings that record intent”.
📚 Background — why the LLM must not make up numbers
An LLM is a model that produces plausible sentences, so it can invent numbers such as “87% chance of heart disease” without any basis (hallucination). That is dangerous where numbers matter, as in medicine. So this Agent splits the roles.
- Judgment (numbers) comes from the Tool AI, trained and validated on data — the model that saw both hospitals’ data through federated learning
- Explanation (sentences) only comes from the LLM — the Harness enforces “quote the numbers as is, never make them up”
This structure keeps the value of the federated model intact inside the Agent.
5) Test (Test & Build tab)
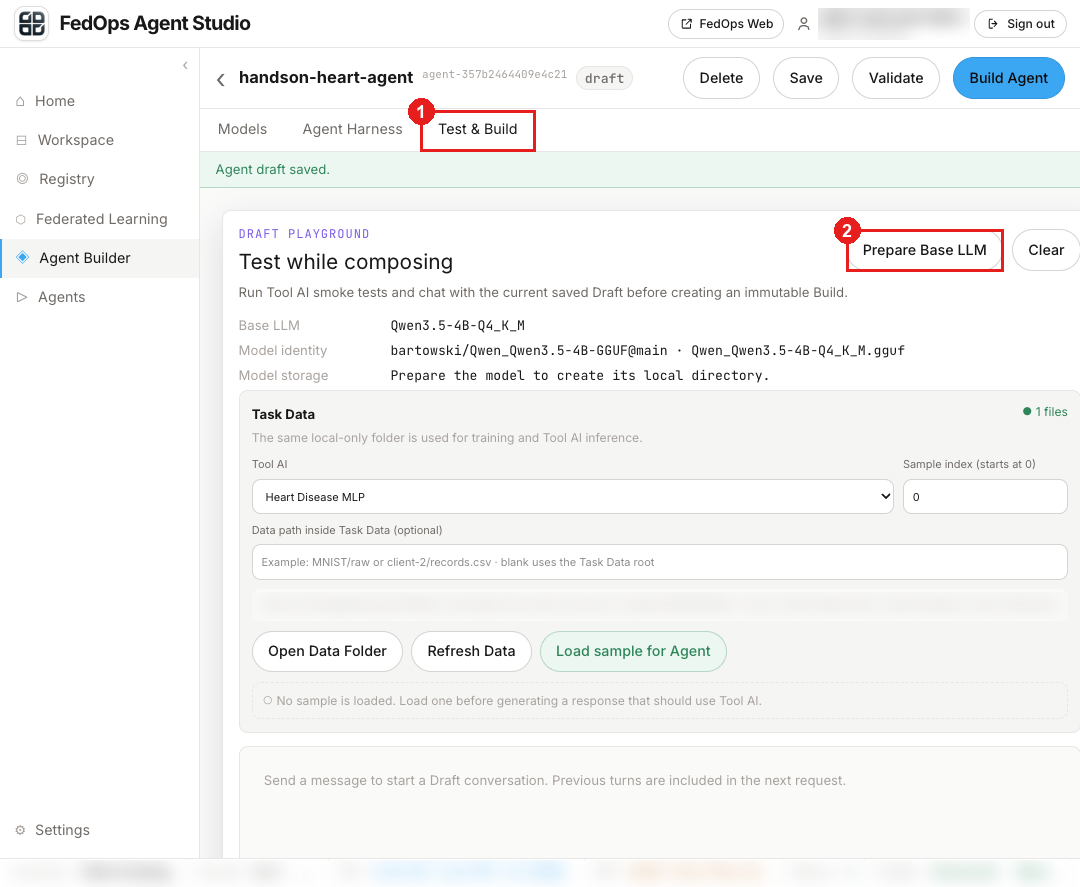
- Click the Test & Build tab.
- Click Prepare Base LLM. It downloads the LLM (about 2.8 GB). The first time it can take tens of minutes; if the file is already downloaded it takes seconds.
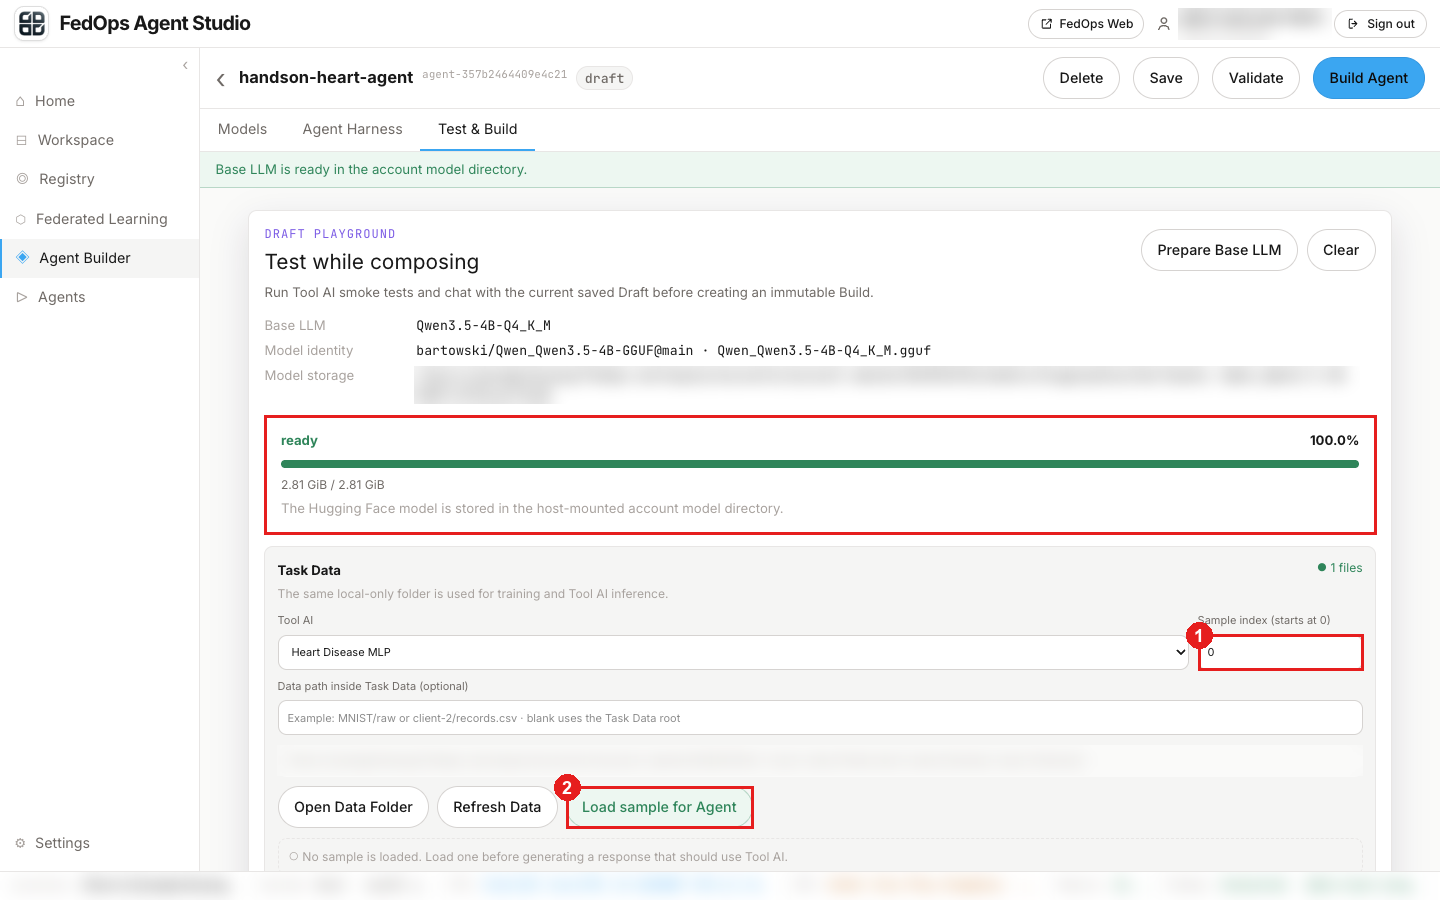
Done when the progress bar shows ready · 100.0%, 2.81 GiB / 2.81 GiB.
- Keep Sample index at
0(row 0 of the Owner’s Hungarian data). - Click Load sample for Agent.
When ● Tool input ready and {"index":0,"rows":261,"label":0,"class_name":"no_disease"} appear, the sample is loaded (the actual label is no heart disease). The input is 10 values such as age, blood pressure, and chest pain type. Braces shown literally in the middle, such as Sample {index} is loaded, are a Studio text issue; ignore them.
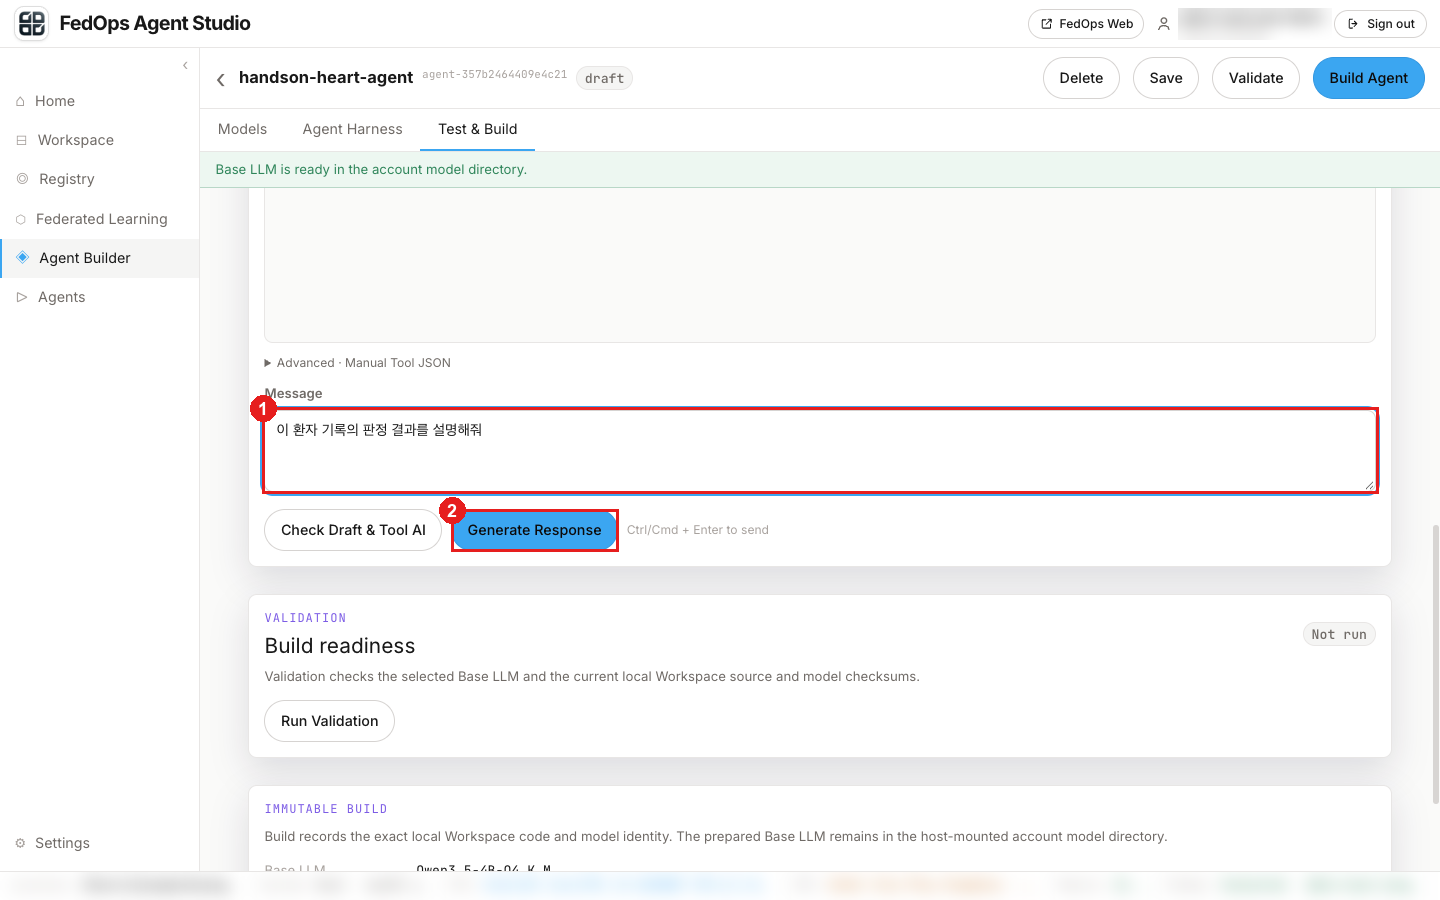
- Delete the default text in the Message box (English, meant for images) and enter
이 환자 기록의 판정 결과를 설명해줘(“Explain the result for this patient record”; English works too). - Click Generate Response. Measured about 2 min 20 s on 2026-10-20 (Tool 9 s).
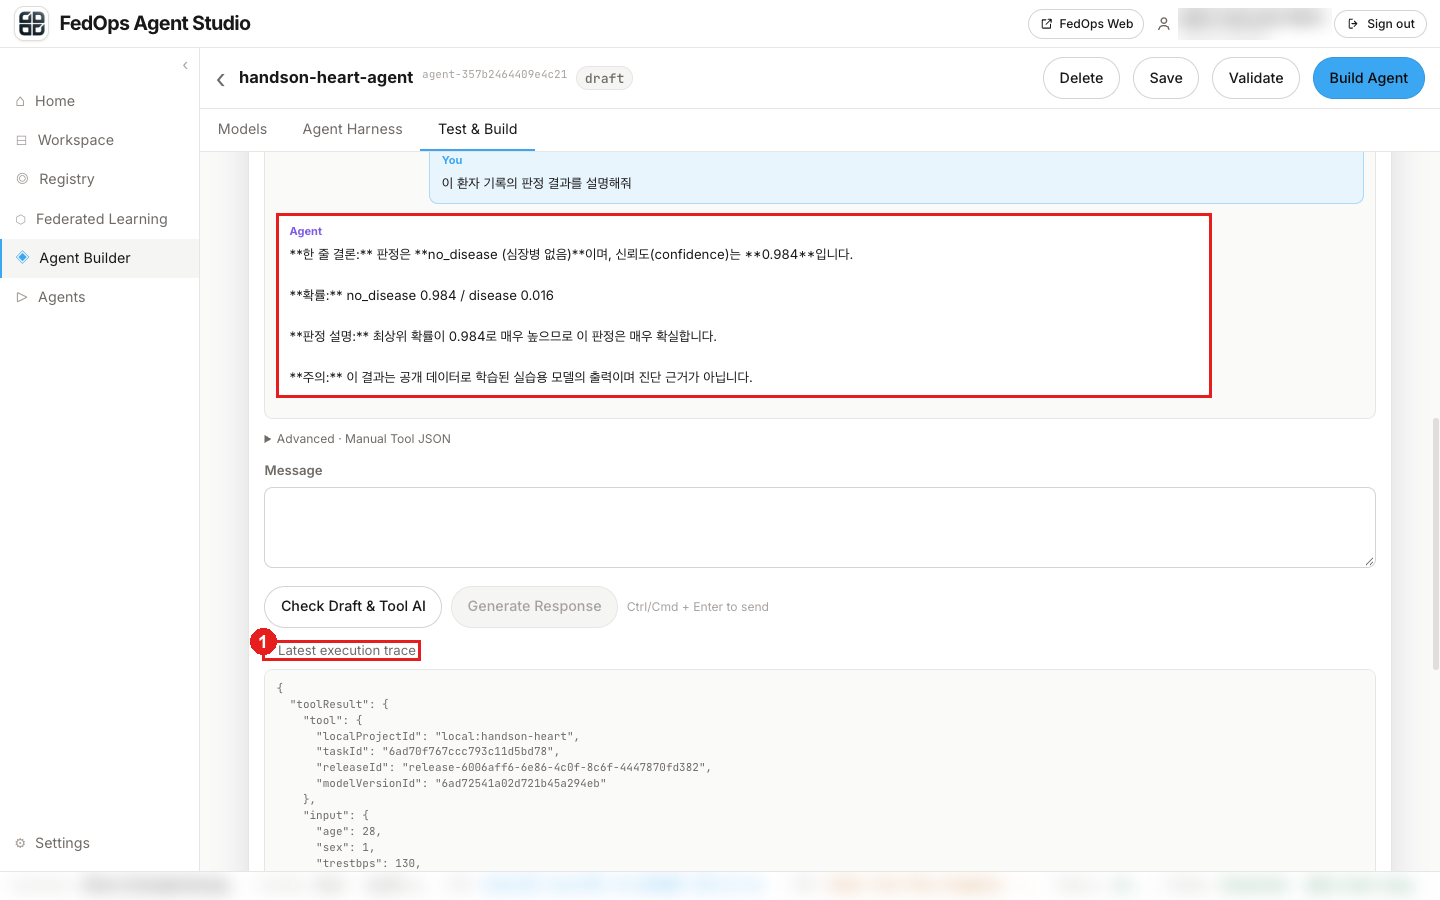
The Agent’s answer appears.
- Expand Latest execution trace and compare the numbers in
toolResult.resultwith the numbers in the answer.
Measured 2026-10-20 (Global Model v1). The LLM answers in Korean following the Harness; translations are on the right.
Tool 결과 : no_disease, confidence 0.9844 (no_disease 0.9844 / disease 0.0156)
LLM 답변 : 한 줄 결론: 판정은 no_disease (심장병 없음)이며, 신뢰도(confidence)는 0.984입니다.   ← One-line conclusion: no_disease (no heart disease), confidence 0.984
            확률: no_disease 0.984 / disease 0.016                                         ← Probabilities
            판정 설명: 최상위 확률이 0.984로 매우 높으므로 이 판정은 매우 확실합니다.          ← The top probability is 0.984, so this is very certain
            주의: 이 결과는 공개 데이터로 학습된 실습용 모델의 출력이며 진단 근거가 아닙니다.  ← Note: practice model on public data, not a basis for diagnosis
This time it kept the Harness’s four-line format and “no percentages” exactly. ** shown literally on screen is because Studio does not render Markdown.
It succeeds if the numbers match the Tool result. A small LLM (4B) sometimes breaks the Harness’s format rules (e.g. no percentages) or skips part of the format. If the values differ, fix the Harness; if only the format differs, move on.
The same row gives different probabilities with the Initiative Model and the Global Model.
6) Validate and build
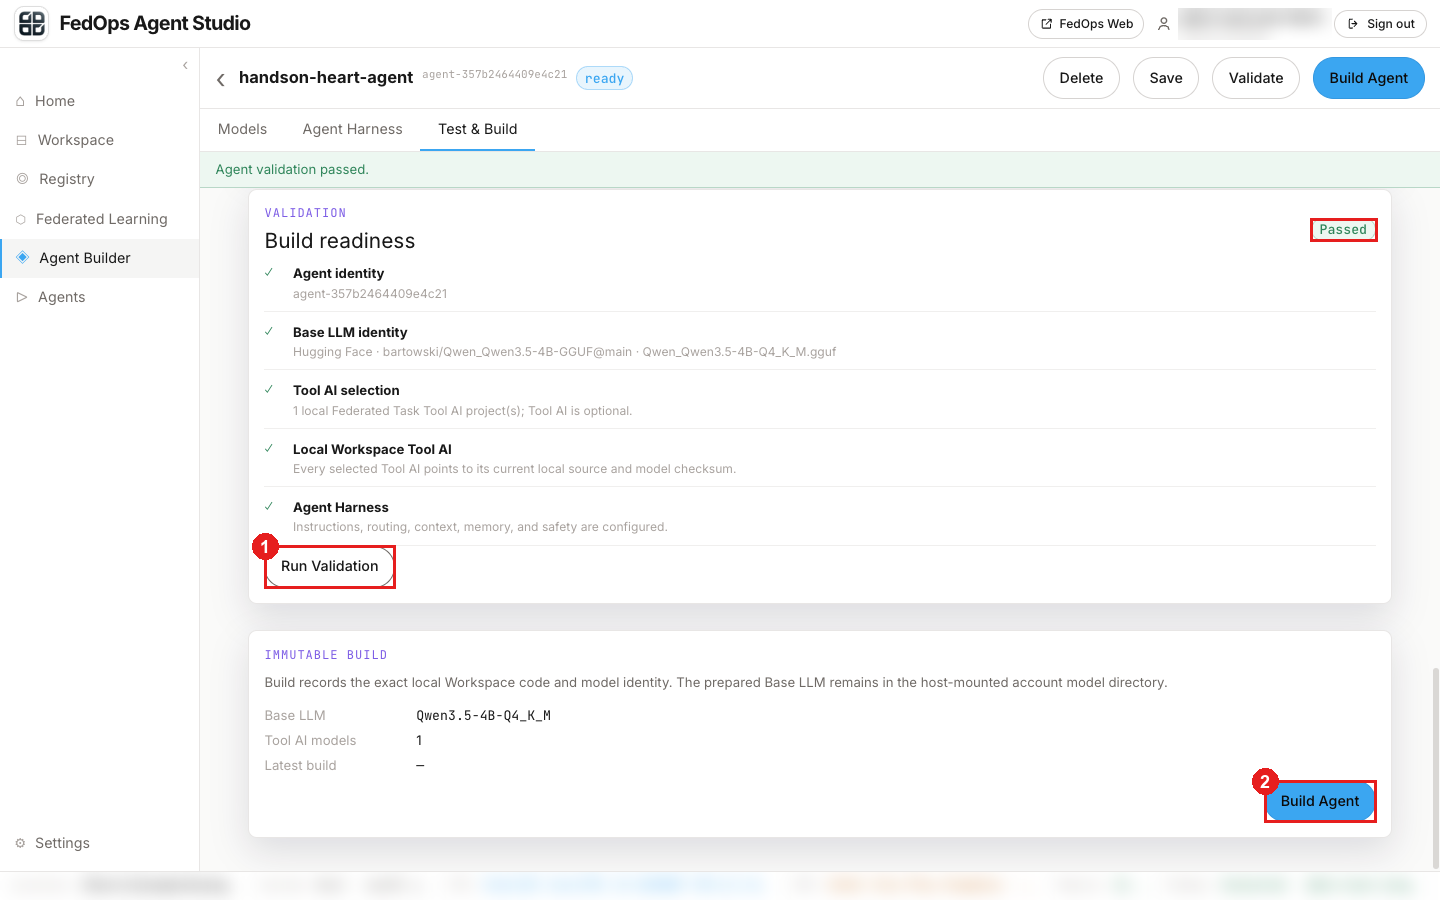
- Scroll down and click Run Validation. After a few seconds the right side shows
Passedwith all five items ✓. - Click Build Agent.
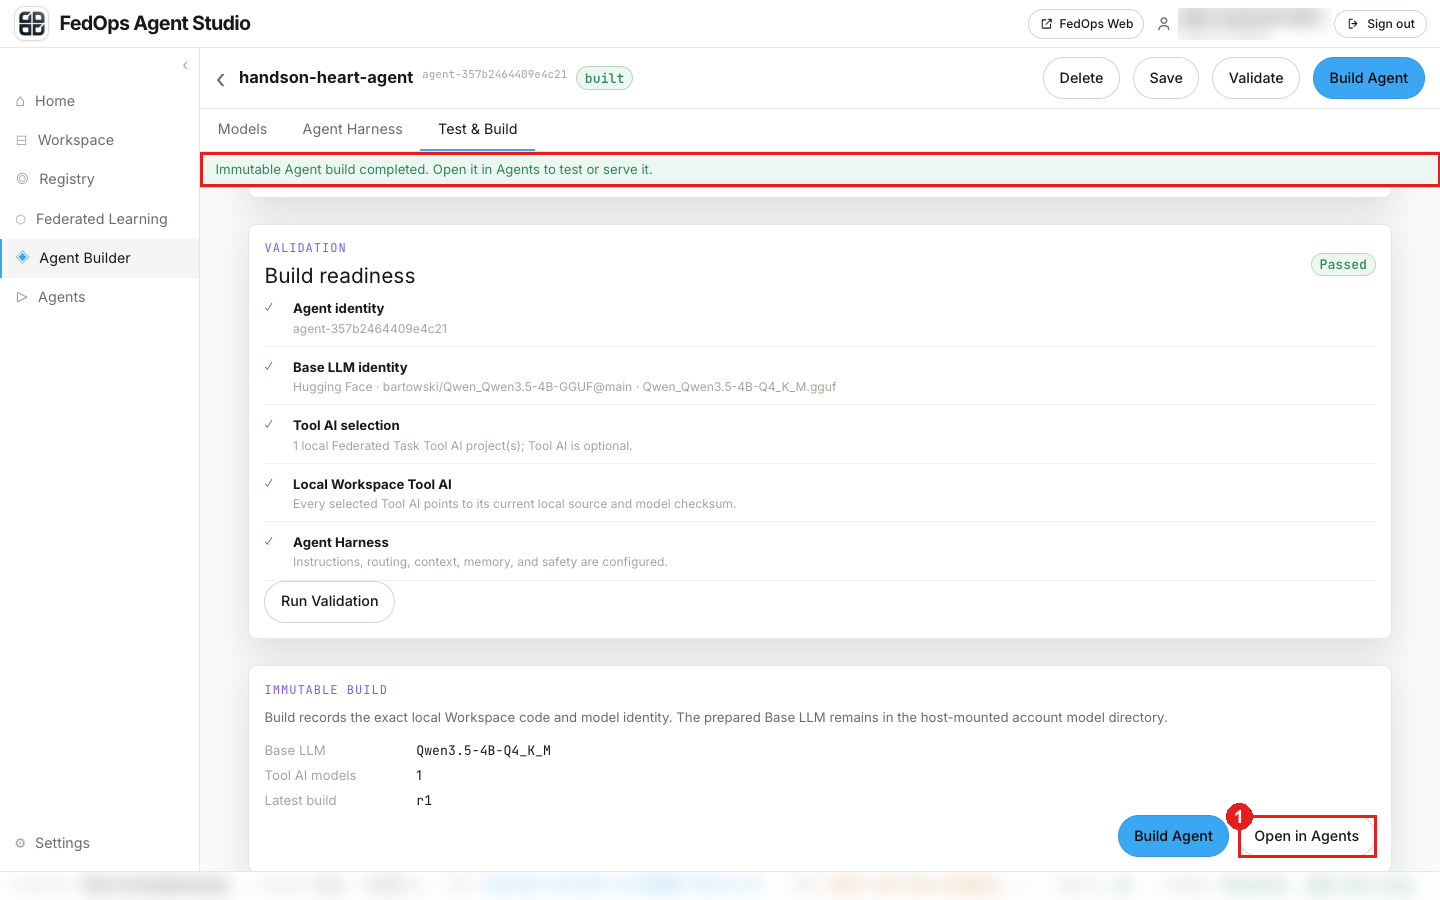
Done when you see Immutable Agent build completed., the built badge next to the name, and Latest build r1. It takes seconds.
- Clicking Open in Agents leads to the next chapter (Serving API).
If you changed the Tool code or the Harness, always build again. A build pins the code and model at that moment.
✅ Checklist
- You added Heart Disease MLP (Global Model v1) as the Tool AI
- You chose a Base LLM and saved
- You pasted the Harness and saved with
explicit·none - The Base LLM is
ready · 100% - The numbers from Generate Response match the Tool result
- Validation
Passed, buildr1complete
If something goes wrong
| Symptom | Fix |
|---|---|
An Agent draft with this name already exists. | A draft with the same name from before remains. Deleting the Agent on the Agents screen leaves the Agent Builder draft separately. Open that draft in Agent Builder and delete it with Delete at the top, or use another name |
| Delete on the Agents screen does nothing | Delete is locked while that Agent’s Serving API is on. Click Disable API in the Serving API tab first |
| The Tool AI list is empty | Do Local Train in Owner Track ch. 4 first |
... changed after selection. Select it again and rebuild the Agent. | Refresh the page, pick the Tool AI again, and Add (appears when picking a Global Model for the first time after federated learning) |
Test & Build shows Base LLM: Not selected | You chose it in the Models tab but did not Save |
| Validation fails | Fix what the failed item points to. If it is the Base LLM, start with Prepare |
| Too slow | Close other programs. Under 16 GB it is a struggle |