
2. Workspace and My Data
📍 Where you are: Client 2/5 — ① Find · request → ② Workspace · data → ③ Readiness check → ④ Join → ⑤ Wrap-up
Screen: Agent Studio · Prerequisite: the Owner approved your participation
🎯 What you do in this step: Bring the code the Owner published into your Studio (Workspace), install the runtime, and put your data (Cleveland hospital) in a fixed folder on your PC. The data stays only in this folder and is uploaded nowhere. In chapter 4, the Owner’s code reads the data in this folder and trains inside your PC.
- 1) Open the Workspace
- 2) Install the Python environment (Sync)
- 3) Build my data
- 4) Place my data
- ✅ Checklist
- Next
1) Open the Workspace
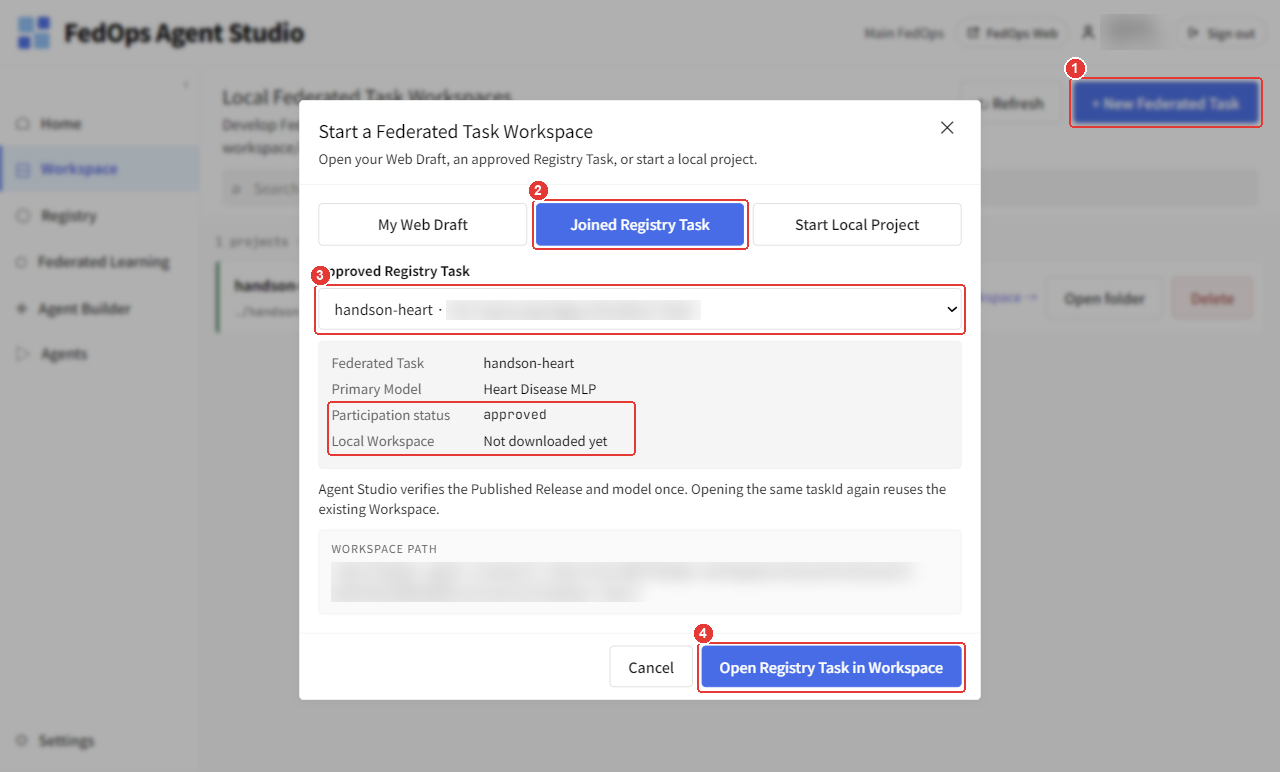
- In the Studio left menu Workspace, click + New Federated Task at the top right.
- Choose the Joined Registry Task tab.
- In Approved Registry Task, pick
handson-heart · <Owner handle>/handson-heart. Below it you seeParticipation status: approvedandLocal Workspace: Not downloaded yet. - Click Open Registry Task in Workspace. Studio verifies the published Release and model once and opens the Workspace (reopening the same Task reuses the existing Workspace).
Either of the two ways below gives the same result. The one above opens it from Workspace.
| Way | Steps |
|---|---|
| From the Registry | Studio left menu Registry → Public Registry → select the Task → Open in Workspace |
| From Workspace | Studio left menu Workspace → + New Federated Task at the top right → Joined Registry Task tab → select the approved Task |
The Owner opens it from the My Web Draft tab of the same window (Owner Track ch. 3). The Client uses Joined Registry Task. The tab name is exactly the difference between the roles.
The Client does not edit the code. The code you received must stay exactly the Release the Owner published. If you change it, the check in chapter 3 blocks you with “differs from the published Release”, and even if you could join with changes, your parameters could not be merged with other participants’. If the code has a problem, tell the Owner to publish a new Release.
2) Install the Python environment (Sync)
① Python Environments tab
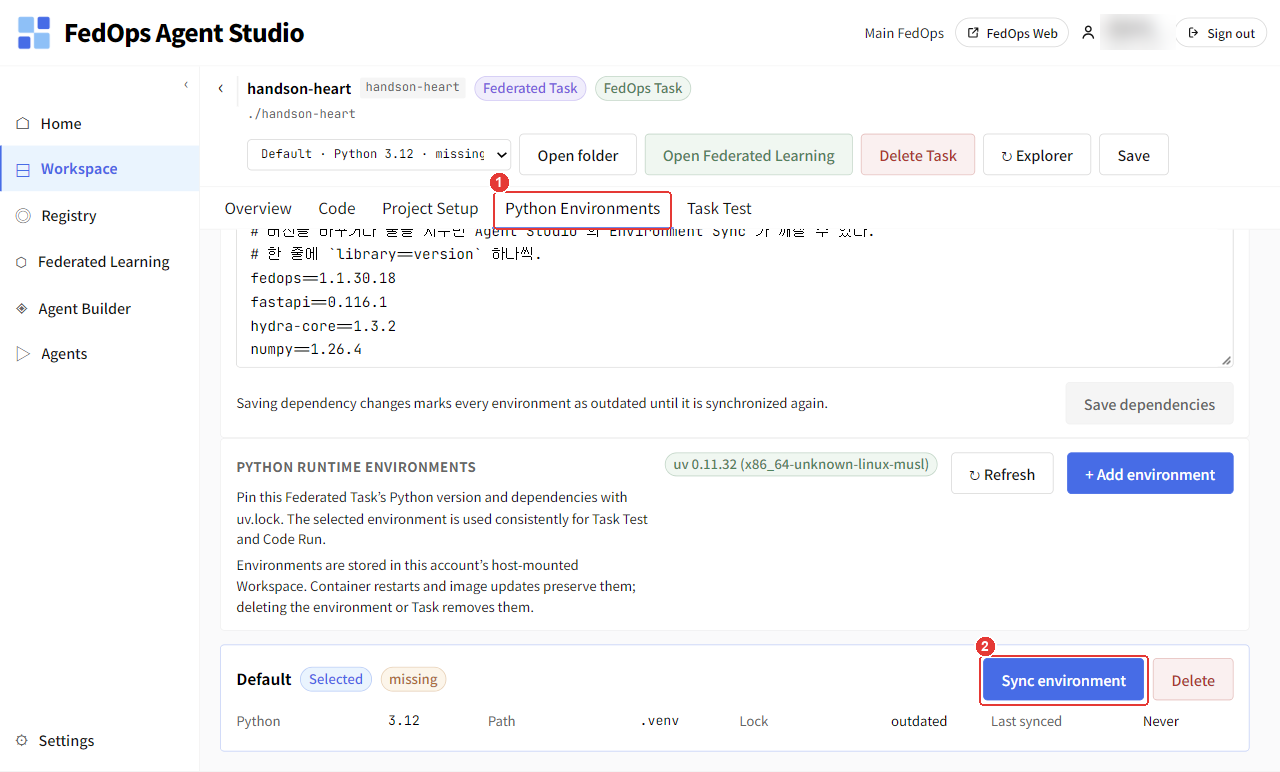
- Click the Python Environments tab.
- Scroll down and click Sync environment for the Default environment.
② In progress
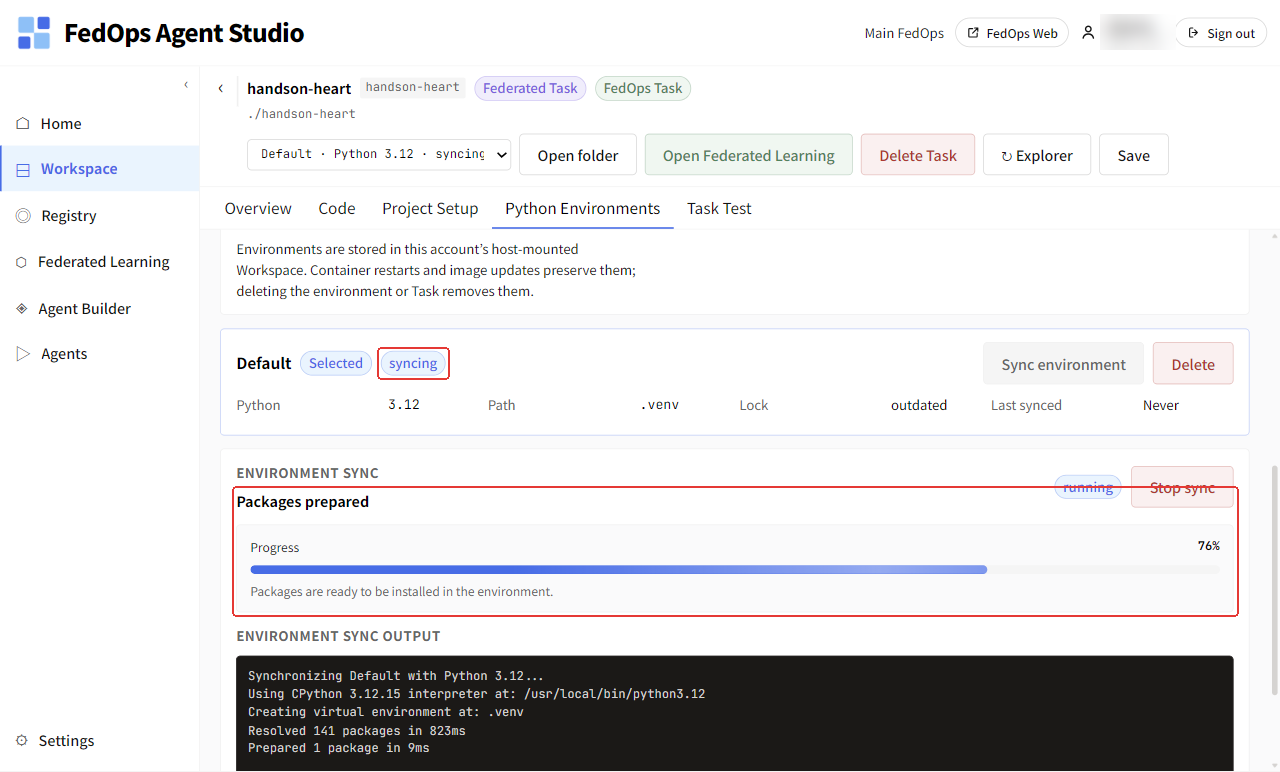
It takes around 10 minutes to download 141 packages including torch (about 12 min 20 s, measured on a Windows laptop on 2026-10-20). It looks stuck at 76% Packages prepared for a long time (about 11 minutes this time), but it is installing packages, so wait.
③ Done
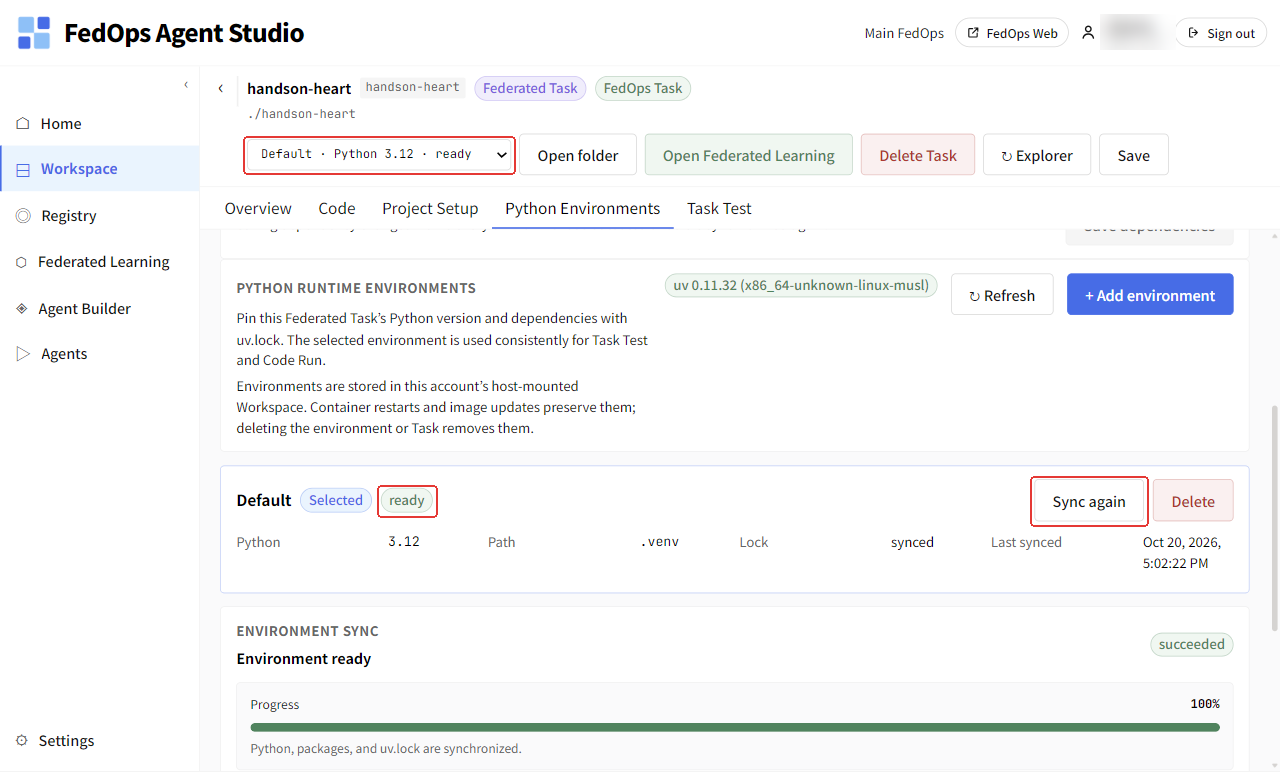
Done when the environment indicator at the top changes to Default · Python 3.12 · ready. The Default environment card below also shows ready, and the button changes to Sync again.
Exactly the
requirements.txtthe Owner set is installed. Every participant must train with the same packages for the results to mean the same thing.
3) Build my data
Build your data from the original Cleveland hospital file included in the template. If you have not downloaded the template yet, get it first as in step 5) of Basics ch. 3.
cd FedOps-hands-on-guide/template/data
pip install numpy pandas
python prepare_data.py
It is fine if the output includes cleveland/dataset.csv 303행 no_disease=164(54%) disease=139(46%) (행 = rows).
4) Place my data
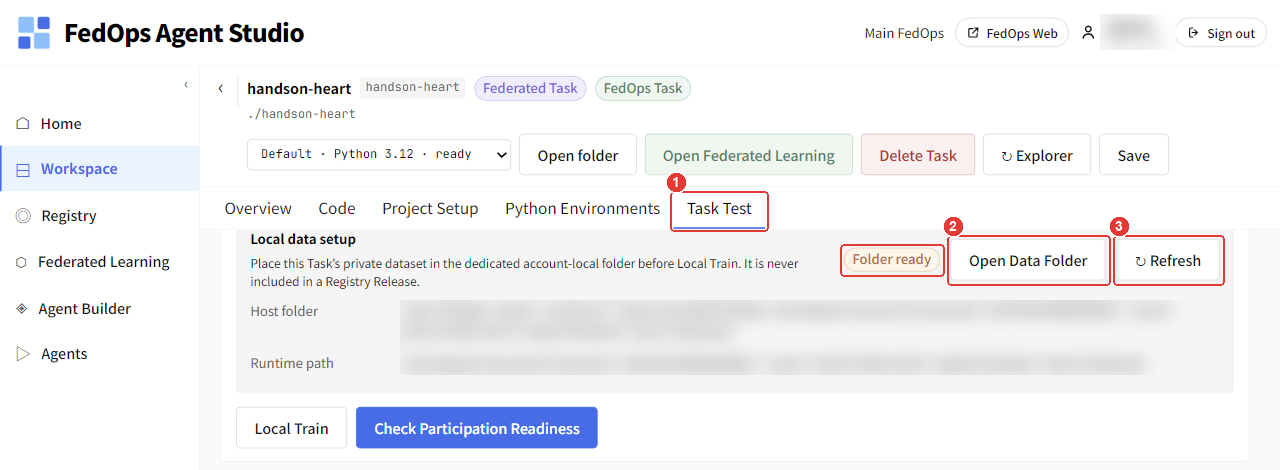
- Click the Task Test tab. Local data setup shows
Folder ready. - Click Open Data Folder to open this Task’s own data folder. Put
out/cleveland/dataset.csvfrom 3) there, keeping its name. - After placing the file, click Refresh.
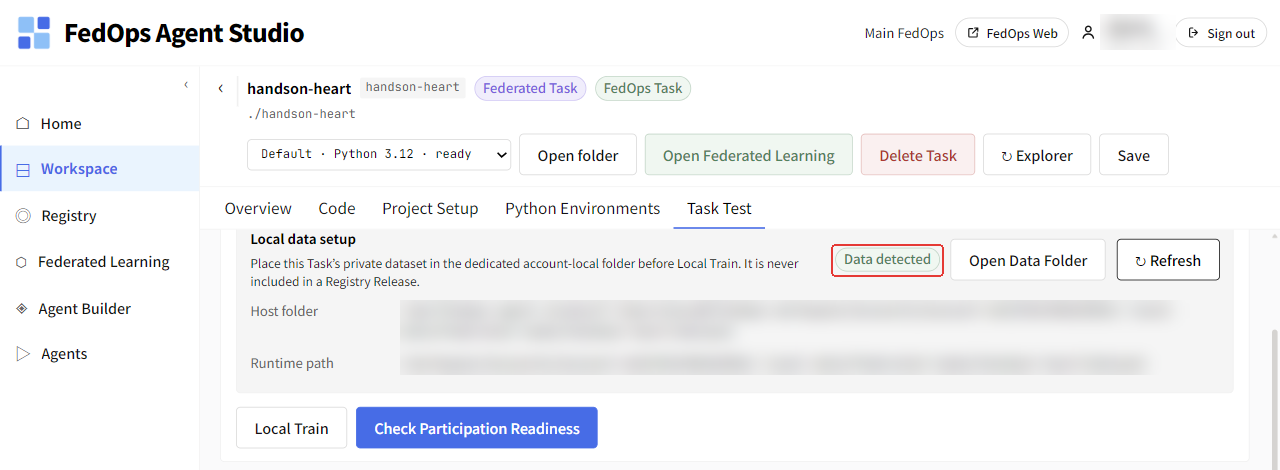
Done when Folder ready changes to Data detected. The file name must be exactly dataset.csv, not inside a subfolder. Be careful not to put in the file from the hungarian folder; that is the Owner’s hospital data.
⚙️ Explained — what my data must satisfy
The README’s Local data setup is the standard.
| Condition | This Task | If violated |
|---|---|---|
| File name | One dataset.csv | Data detected does not appear |
| Column names | 10 features + target — header names must match exactly | The chapter 3 check fails with a missing column |
| Values | cp only 1–4, restecg only 0–2. target 0 or 1 | Check or training fails (value not in the vocabulary) |
| Classes | At least 3 rows per class | Class shortage error |
Do not run the preprocessing statistics script (
tools/embed_preprocessing.py). The README says “if you changed or first prepared the data, only the Task Owner updates the fixed preprocessing state”. That is what the Owner does when building the code. If a Client runs it, the code changes and no longer matches the published Release. The Client must use the statistics the Owner fixed on the Hungarian data, so that both hospitals’ numbers are transformed on the same basis (Owner Track ch. 1, section 4).
📚 Federated learning background — same format, different distribution
Federated learning assumes every participant’s data has the same format (same columns, same meaning, same units). But the distribution can differ, and usually does. Your data (Cleveland) has 46% heart disease, the Owner’s Hungarian data 38%, and patient ages and test values are distributed differently too. Getting the effect of combining everyone’s data in this situation — same format, different distribution (non-IID) — is federated learning’s job.
If formats differ (e.g. one hospital records cholesterol in mg/dl and another in mmol/L), checks may pass but the model learns nonsense. Code cannot catch such differences in meaning, so in real collaborations aligning the data definitions comes first. UCI Heart Disease has relatively little of this problem because the four hospitals collected records with the same item definitions in the 1980s.
✅ Checklist
- The Task you joined is open in the Studio Workspace
- The Python environment is
ready - You built
cleveland/dataset.csvwithprepare_data.py - Task Test shows
Data detected - You did not change any code