
3. Demo App · Plug into Your Project
📍 Where you are: Model Use 3/3 — ① Agent → ② Serving API → ③ App
Screen: browser + your code · the last step of the tutorial
🎯 What you do in this step: Use the Agent through the demo app, which puts a screen on the same minimal code, and change inputs to see how the model’s numbers move and how the LLM explains them. Finally, learn how to call the Agent from your own project. This is where federated learning that started from two hospitals’ data ends as one service feature.
The demo app’s screen text is in Korean. This page gives English translations in parentheses.
- 1) Run the demo app
- 2) Try ① — send a sample
- 3) Try ② — change input values
- 4) Try ③ — send without the Tool
- 5) Plug into your project
- Rules for your design
- ✅ Checklist
- Wrapping up the tutorial
agent_client.py ──┬──▶ test_agent.py   (CLI)
                   └──▶ demo_ui.py      (web app)
                            └──▶ your project
1) Run the demo app
It uses the .env from chapter 2 as is. Python 3.10 or later is required (on 3.9 it does not start, with Unable to evaluate type annotation 'int | None').
cd app
uvicorn demo_ui:app --port 8090
Open http://localhost:8090 in your browser.
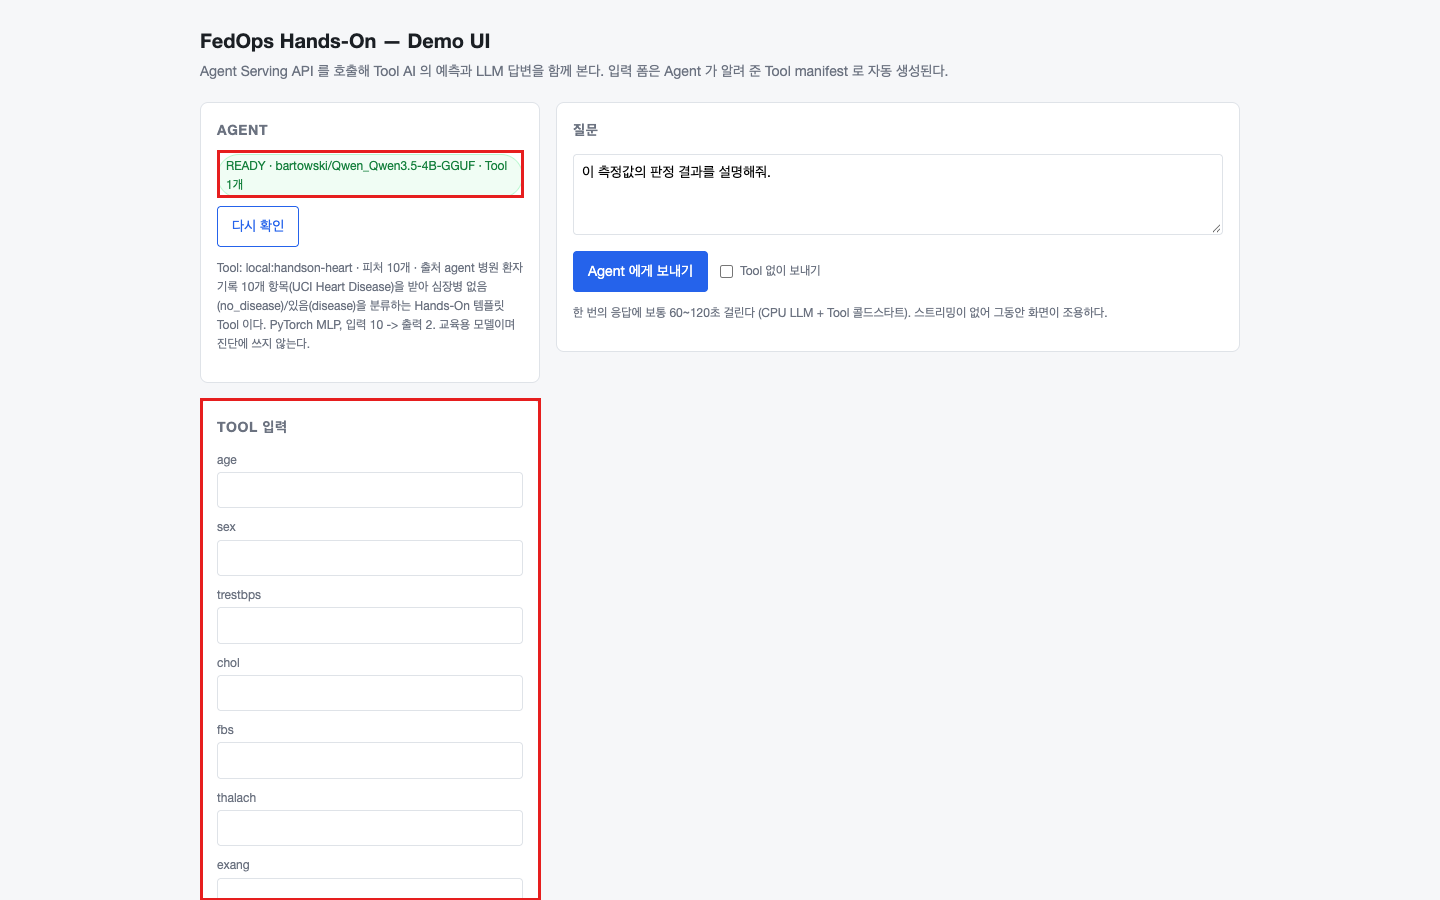
The app is connected to the Agent when the AGENT box at the top left shows READY · bartowski/Qwen_Qwen3.5-4B-GGUF · Tool 1개 (1 Tool). The TOOL 입력 (Tool input) fields below are not hard-coded; they are built from the Tool spec the Agent’s /info returns (출처 agent, source agent). The 8 numeric values become number fields, and cp (chest pain type) and restecg (ECG) become select boxes with fixed values, because the spec lists their allowed values (enum). If the Agent is off, the form is drawn from a local spec file and marked 출처 local-file.
2) Try ① — send a sample
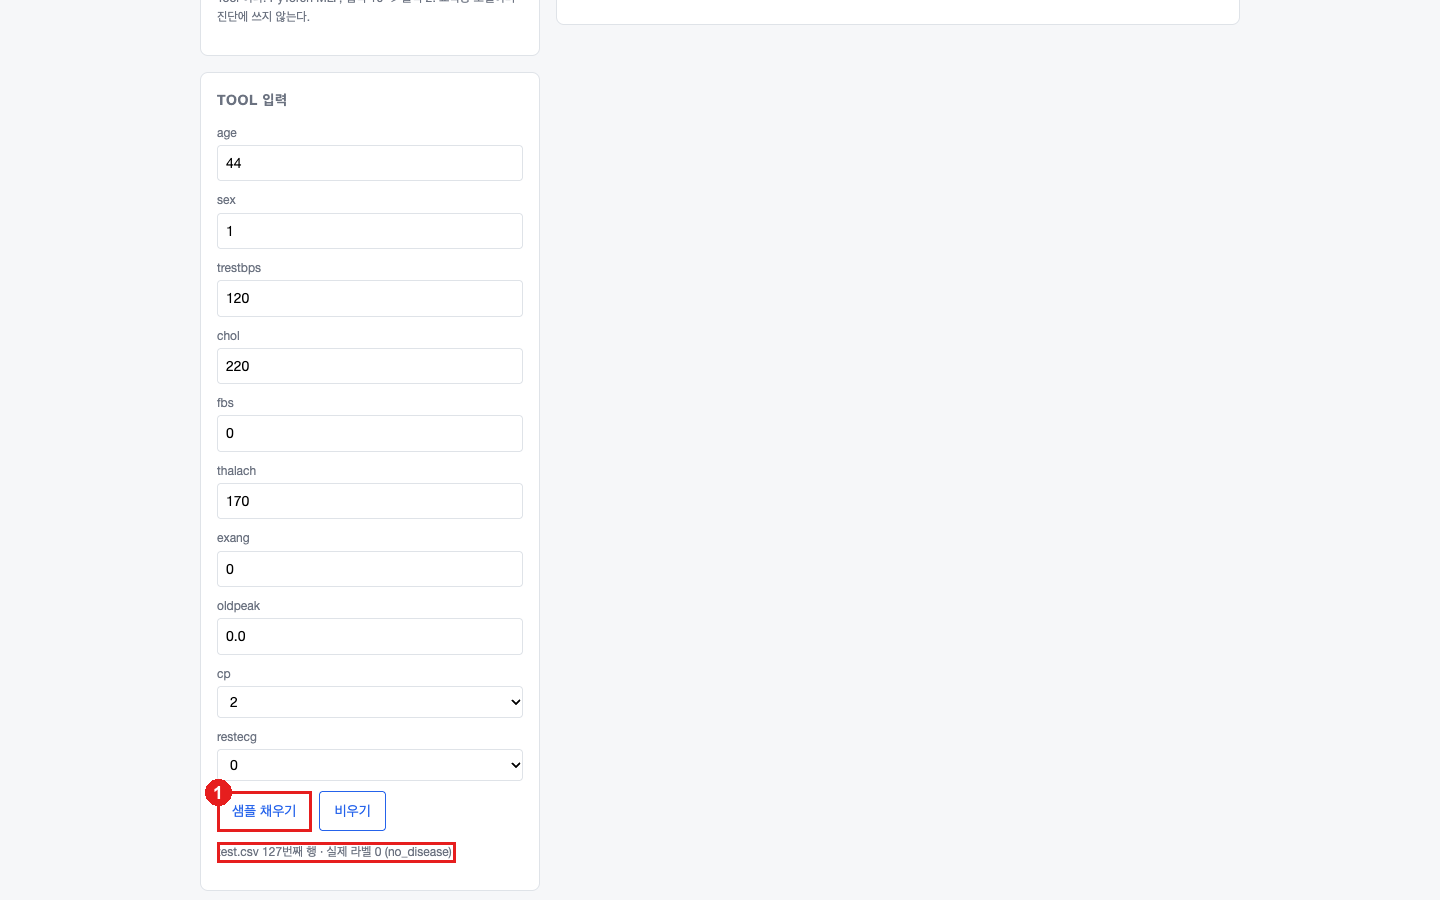
- Click 샘플 채우기 (Fill sample) at the bottom of the Tool input.
One real row of data/out/test.csv is filled in at random, with the row number and actual label below. This time it was test.csv 127번째 행 · 실제 라벨 0 (no_disease) (row 127, actual label 0).
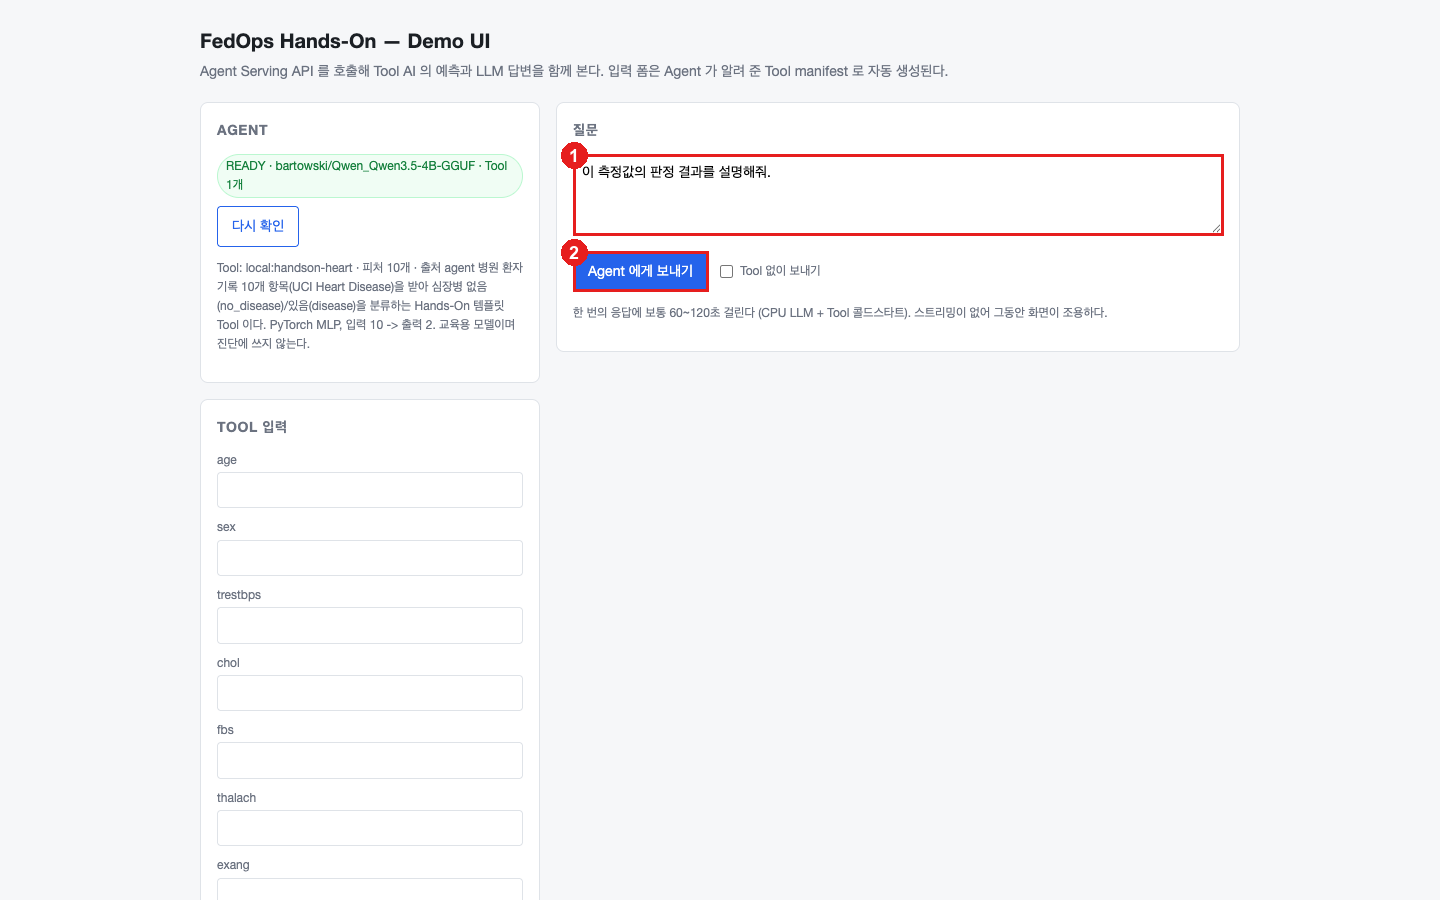
- Scroll up and check the sentence in the 질문 (Question) box (the default is fine).
- Click Agent 에게 보내기 (Send to Agent). It takes about a minute. There is no streaming, so the screen stays quiet meanwhile.
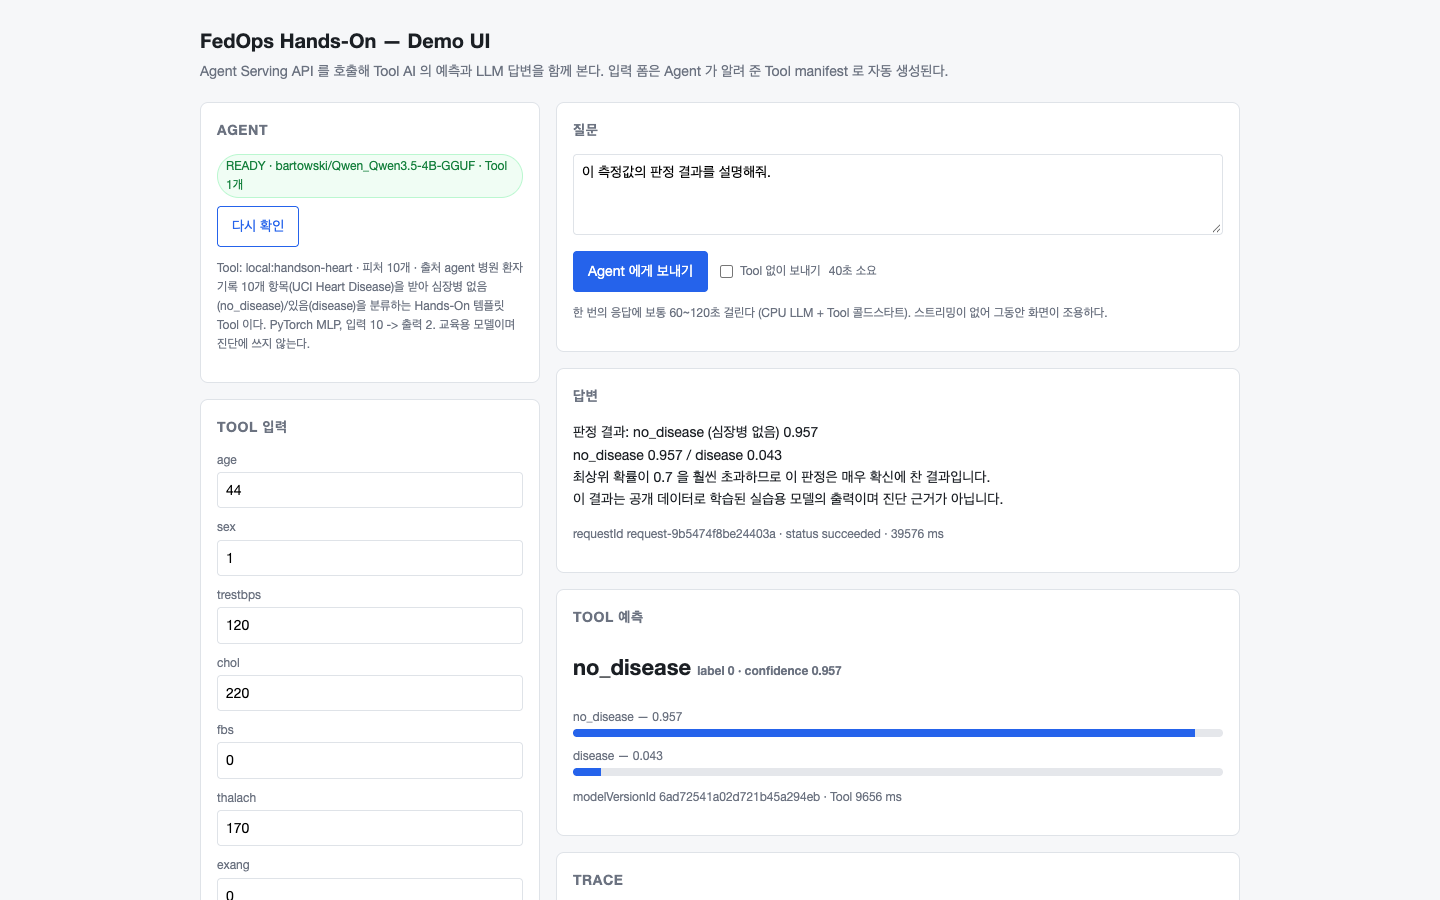
The 답변 (Answer), TOOL 예측 (Tool prediction) card, and TRACE table appear in order.
Measured 2026-10-20 (40 s):
- Tool prediction: no_disease 0.957 / disease 0.043
- Answer:
판정 결과: no_disease (심장병 없음) 0.957 … 진단 근거가 아닙니다.(Result: no_disease (no heart disease) 0.957 … not a basis for diagnosis.) - TRACE:
tool-routing,tool-ai(9656 ms),base-llmall passed
The numbers in the answer should match the Tool prediction card. Being a 4B model, it sometimes writes percentages. That is fine as long as the values match.
3) Try ② — change input values
The change shows best on a row predicted as no heart disease. If the row was predicted as heart disease, click Fill sample again.
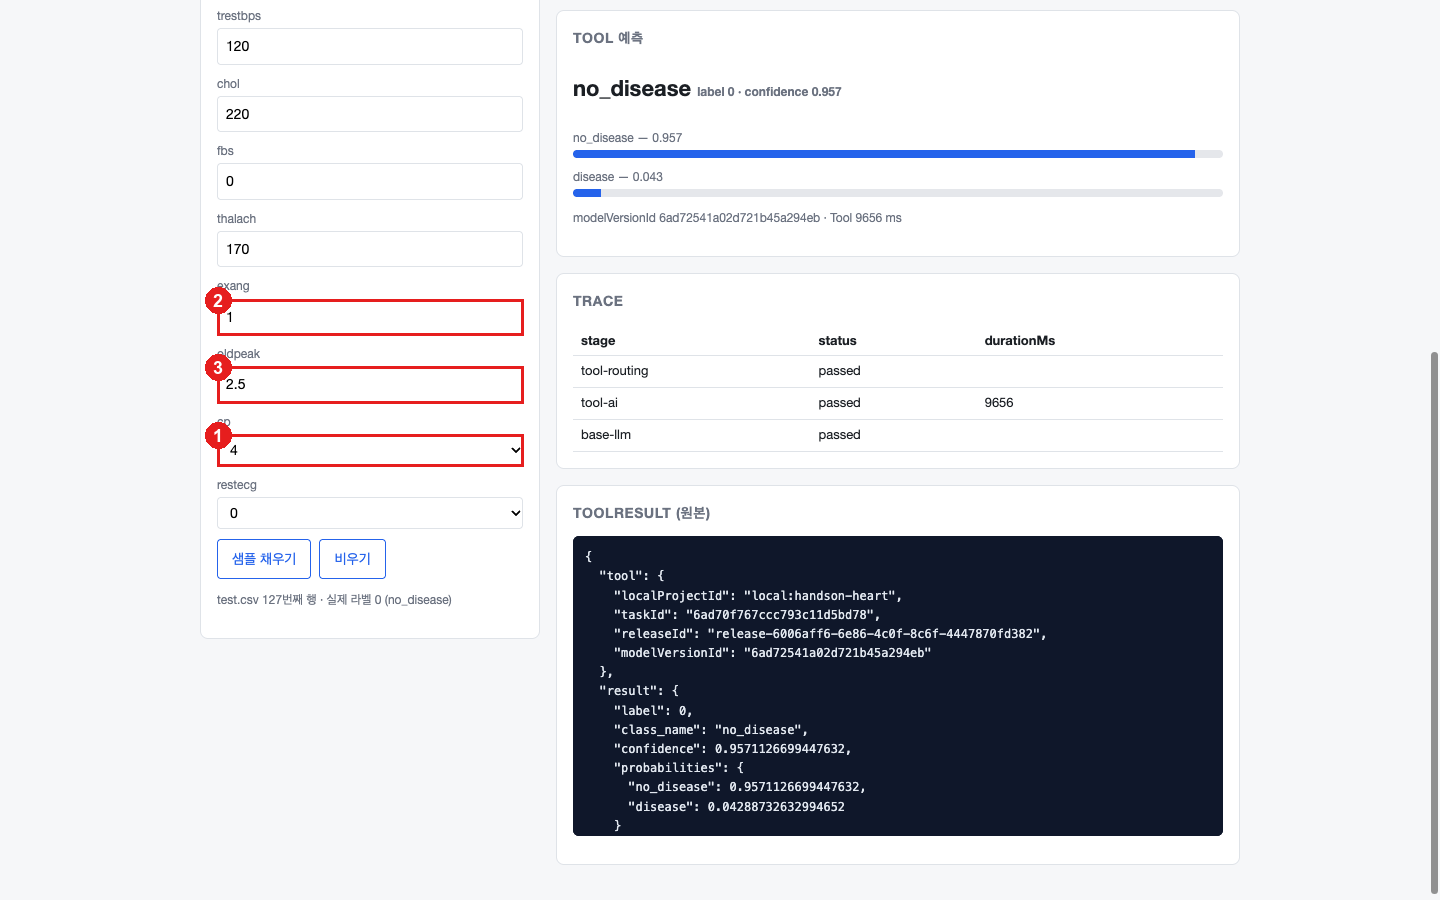
- Change cp (chest pain type) to
4(asymptomatic). - Change exang (exercise-induced angina) to
1. - Change oldpeak (ST depression) to
2.5.
Then scroll up and click Agent 에게 보내기 (Send to Agent) again.
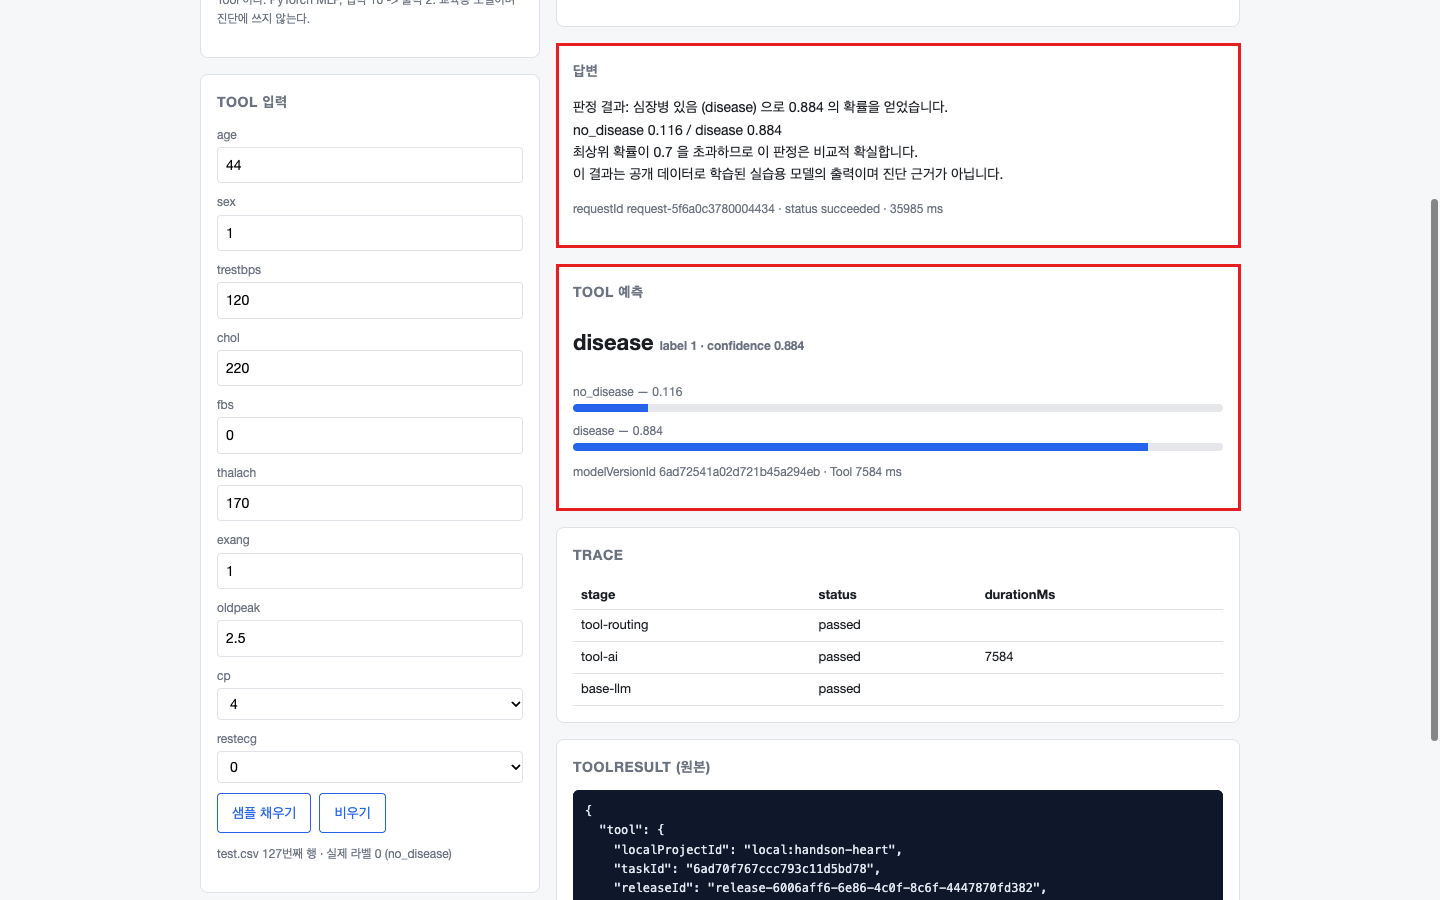
Changing only three values for the same patient flipped the result from no_disease 0.957 → disease 0.884 (measured 2026-10-20, 36 s). When the top probability drops below 0.7, the LLM states “the result is not certain” following the Harness rules. This time it was 0.884, so it answered “relatively certain”.
In this data many patients “have no chest pain (
cp= 4) but do have heart disease”, socp= 4 is a signal leaning toward heart disease. It may go against intuition, but the model only learns the patterns in the data.
4) Try ③ — send without the Tool
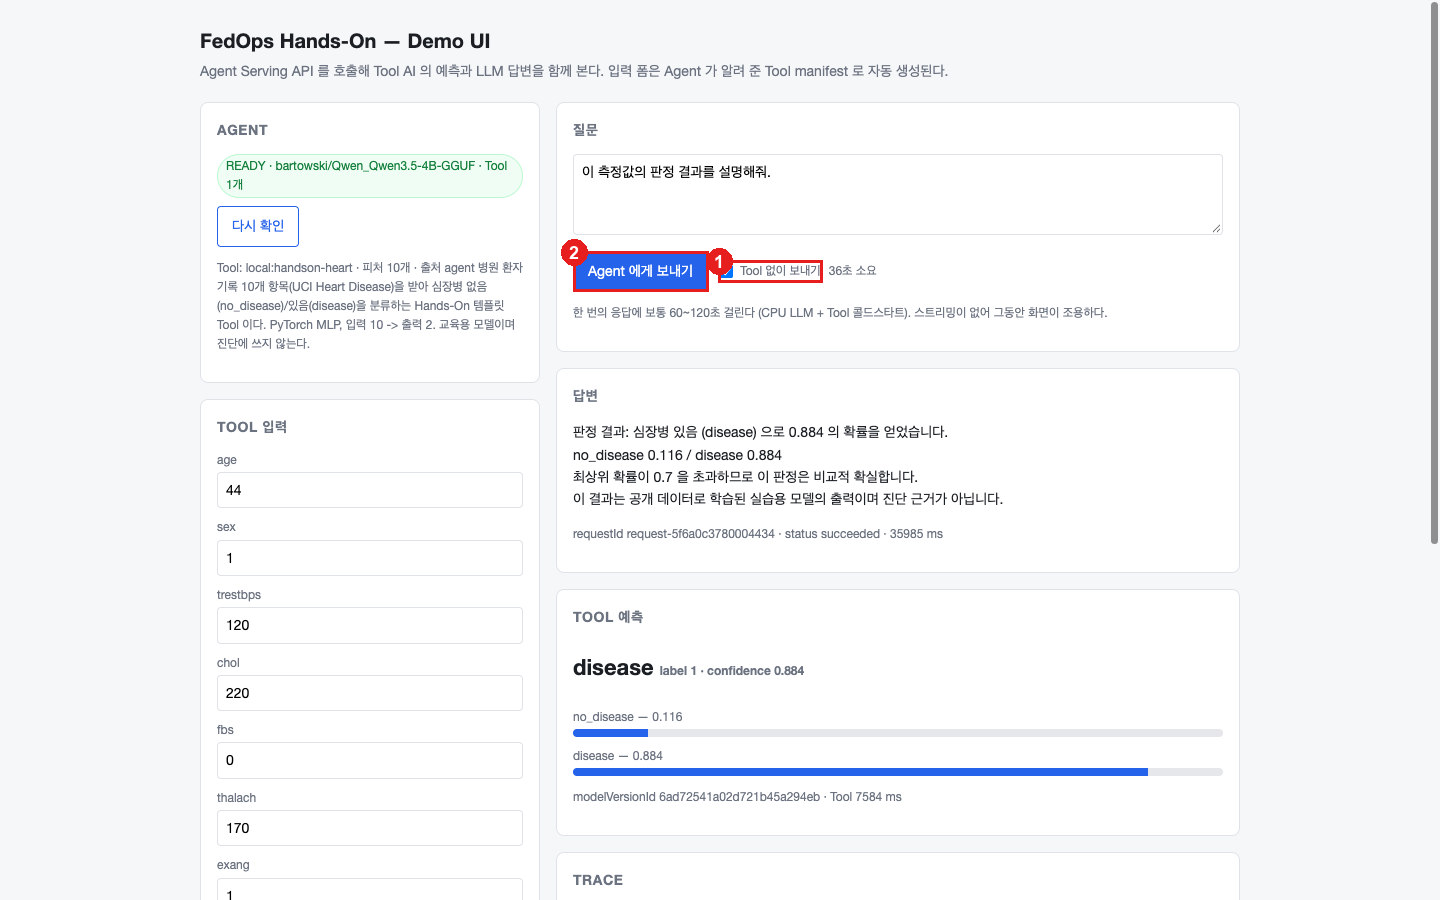
- Turn on Tool 없이 보내기 (Send without Tool).
- Click Agent 에게 보내기 (Send to Agent).
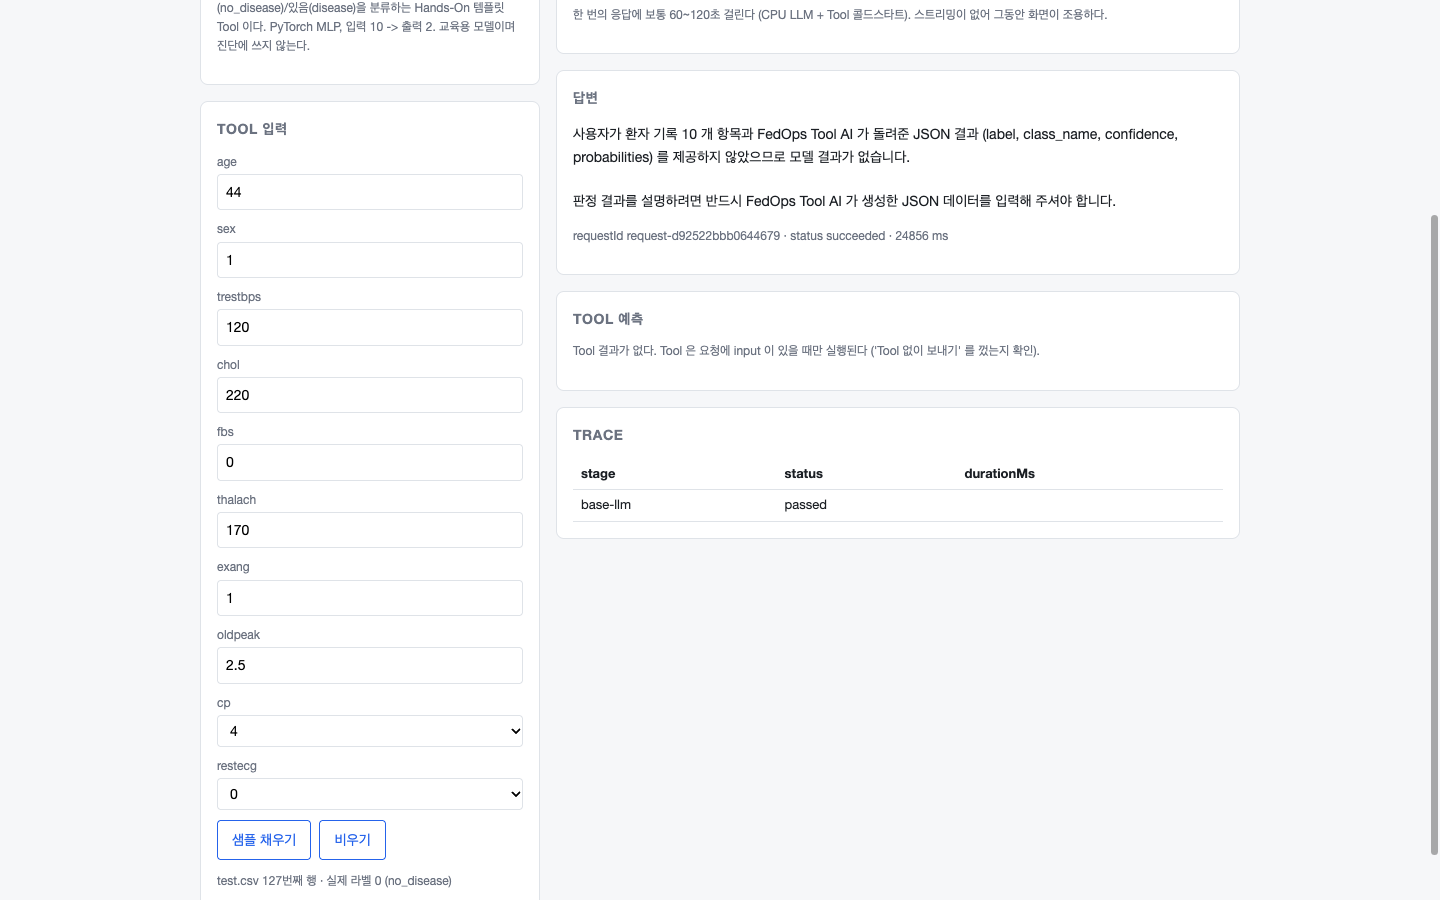
The Tool prediction is empty and only base-llm remains in the TRACE. The LLM does not judge and answers “… 모델 결과가 없습니다” (… there is no model result) (measured 2026-10-20, 25 s). The Tool runs only when the request has input, and the Harness stops the LLM from judging by guesswork.
5) Plug into your project
Copying one file is all it takes. (On 2026-10-20 we confirmed the code below works with just an empty folder + httpx: 52 s, no_disease 0.982.)
cp template/app/agent_client.py <your project>/
pip install httpx
export AGENT_SERVING_URL=http://localhost:24400
export AGENT_SERVING_TOKEN=fas_...
export AGENT_TOOL_ID=local:handson-heart
from agent_client import AgentClient, AgentUnavailableError, AgentStatus, to_prediction

client = AgentClient.from_env()
try:
    envelope = client.chat(
        "Explain the result for this patient record",
        tool_input={
            "age": 29, "sex": 1, "trestbps": 120, "chol": 243, "fbs": 0,
            "thalach": 160, "exang": 0, "oldpeak": 0.0, "cp": 2, "restecg": 0,
        },
    )
except AgentUnavailableError as error:
    if error.agent_status is AgentStatus.BAD_INPUT:
        ...  # a bug in my payload
    elif error.agent_status is AgentStatus.NEEDS_REBUILD:
        ...  # tell the operator: rebuild the Agent
    raise

print(envelope["response"])            # the LLM's sentence
prediction = to_prediction(envelope)   # label, class_name, confidence, probabilities, model_version_id ...
- The keys of
tool_inputmust be exactly the same as the features in the Tool spec. Leave out the label column (target). - Send
cpandrestecgas numbers ("cp": 2). Values outside the allowed set giveBAD_INPUT. - If you do not know the Tool id, use
client.resolve_tool_id(); for the feature list,client.info()["tools"][0]["toolManifest"]. - To continue a conversation, send earlier turns along:
client.chat(..., history=[{"role": "user", "content": ...}, {"role": "assistant", "content": ...}])(up to the last 40). Regardless of the Harness Memory setting, the Agent remembers exactly what you send (Harness explained in ch. 1).
Rules for your design
Keep the token on the server side only. Do not put it in a browser or mobile app. As in the demo app, have your backend call the Agent, and the frontend call only your backend.
| Situation | Recommendation (40–120 s per call, no streaming) |
|---|---|
| Called while handling a web request | Put it in a job queue and show the result later |
| Must show on screen right away | Show a progress indicator and wait. Timeout of 240 s or more |
| Processing many items | One at a time. Sending them all at once is slower |
If you store predictions, keep modelVersionId (which model answered), requestId, and the payload sent. When the model is retrained the app code stays the same; only AGENT_TOOL_ID and the input keys change.
📚 Background — why probabilities move when inputs change
In 3), changing only cp, exang, and oldpeak moved the probabilities. During training the model learned the pattern “exercise brings on angina and the ST segment drops → toward heart disease”. It learned this pattern not from the Owner’s (Hungary) data alone but from both hospitals’ data through federated learning.
This model, however, does not tell you why it decided as it did (how much each item contributed). That is why the Harness tells the LLM “do not explain contributions”. If you need explainability (XAI), you must put contribution calculations such as SHAP into the Tool’s output, and that is for the Owner to decide in the Task code.
✅ Checklist
- The
READYbadge shows at http://localhost:8090 - The form was generated automatically with 10 fields (8 numbers + 2 select boxes)
- Sending a sample gives Answer, Tool prediction, and TRACE with matching numbers
- Changing values changes the probabilities
- Sending without the Tool gives “모델 결과가 없습니다” (no model result)
- You called it from your project with
agent_client.py
Wrapping up the tutorial
| The path so far | Who | Where |
|---|---|---|
| Data and model design | Owner (Hungary) | My PC |
| Create and publish the Task | Owner | Console + Studio |
| Join request and approval | Client (Cleveland) ↔ Owner | Registry ↔ Console |
| Local training and aggregation | Two hospitals + server | Each Studio + aggregation server |
| Global Model | Owner | Console |
| Agent · API · app | Whoever uses the model | Studio + your code |
Next, try the same flow with your own data and your own model. Start from “To switch to your own data and model” in Owner Track ch. 3 and the Federated Task Developer Guide.